
Artisan Stitch Tutorial • Published:
Front loop only
The Front Loop Only (FLO) crochet stitch is a simple but striking technique that transforms the look and texture of your crochet fabric. Instead of working through both loops of a stitch, you insert your hook into the front loop only, the loop closest to you. This subtle variation adds texture, movement, and decorative ridges to your projects.
Whether you’re working on a blanket, hat, border, or textured design, the FLO method is a beautiful way to elevate even the most basic stitches.
PATTERNS AVAILABLE ACROSS OFFICIAL STORES:
ABOUT
About
.
The Front Loop Only (FLO) technique is an easy way to create dimension and texture in your crochet projects. It works with any stitch type and is an essential tool for adding professional-looking ridges and patterns.
Front Loop Only (FLO) Crochet Stitch: Complete Guide for Beginners
The Front Loop Only (FLO) technique is a simple way to add texture, ribbing, or raised patterns to your crochet projects. Instead of working under both loops at the top of a stitch, you insert your hook only through the front loop.
FLO is commonly used for ribbing edges, adding ridges, and creating decorative stitch patterns.
What Is Front Loop Only (FLO)?
FLO stands for Front Loop Only. Normally, a crochet stitch is made by inserting the hook under both top loops of a stitch, the front and back loop. In FLO crochet, however, you only work into the front loop, leaving the back loop unworked.
This simple change creates a soft ridge on the back of your work and gives the fabric a more flexible, draped texture. It’s often used for decorative patterns or layering effects in both flat and 3D projects.
How to Crochet in the Front Loop Only (Step-by-Step)
What You’ll Need:
- Yarn of your choice
- A matching crochet hook
- Scissors and a yarn needle
Instructions:
1. Start with a foundation row: Create a chain and work one row of your chosen stitch (single crochet, half double crochet, etc.) into both loops as usual.
2. Turn your work: Chain 1 (or the correct turning chain for your stitch).

3. Identify the front loop: Look at the top “V” of each stitch. The front loop is the strand closest to you.
4. Insert your hook: Slide the hook under the front loop only, leaving the back loop untouched.
5. Complete your stitch: Yarn over and finish your stitch as normal.
6. Continue across the row: Work into the front loop of each stitch until the end.
Repeat for as many rows as you like to see the soft, ridged texture form.
What Does the Front Loop Only Stitch Look Like?

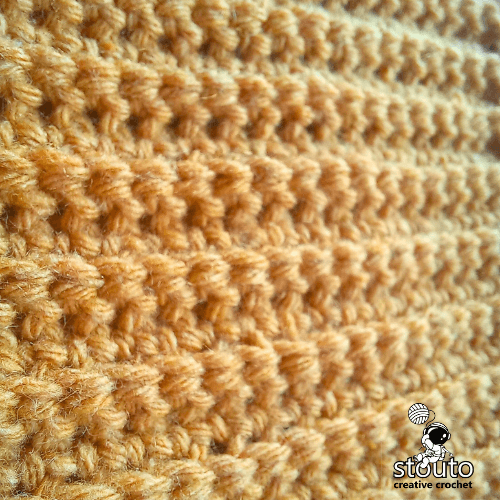
When you crochet in the front loop only, your work develops a horizontal ridge that runs along the back side of the fabric. The front remains smooth and flat, while the back has a soft ribbed texture.
This is especially noticeable when you use FLO with single crochet (FLO sc) or half double crochet (FLO hdc) stitches, creating a subtle yet elegant design element.
When to Use the FLO Crochet Technique
The Front Loop Only stitch can be used for many creative effects in crochet, such as:
- Adding texture: Great for ribbing, decorative stripes, or patterned panels.
- Creating flexibility: Perfect for cuffs, brims, and edges where stretch is needed.
- Design contrast: Alternate rows of BLO and FLO for a wavy or ridged texture.
- 3D detailing: Ideal for amigurumi, petals, or layered crochet patterns.
TERMINOLOGY DECODED
US vs. UK Stitch Translation Matrix
Never let terminology ruin a project. In US terms, stitches are named after the yarn overs; in UK terms, stitches are named after the loops on your hook.
US vs. UK Stitches
Horizontal Scroll Supported
| Symbol / Chart | Stitch Name | UK Equivalent | Quick Method |
|---|---|---|---|
STEP-BY-STEP CROCHET GUIDE
How to Work the Stitch: Step-by-Step
Browse through each row below or follow along round-by-round at your own pace.
Step-by-Step: How to Crochet in the Front Loop Only
Step 1: Make a Foundation Chain
Start by creating a slip knot and chaining the number of stitches you need for your project or practice swatch. Example: Chain 21 for a small sample.
Step 2: Crochet a Base Row
Work your first row as normal, through both loops, to create a solid foundation.
For example:
Single Crochet (sc) in the 2nd chain from the hook and across (20 stitches total). Turn your work.
This gives you a clean row to begin your FLO work on.
Step 3: Identify the Front Loop
Turn your work so you can see the top edge of your stitches. Each stitch has two loops forming a “V”:
- The front loop is the strand closest to you.
- The back loop is the strand behind it.

You’ll be inserting your hook under the front loop only for this technique.
Step 4: Work the FLO Stitches
Depending on the stitch you’re practicing, follow these instructions:

Front Loop Only Single Crochet (FLO sc)
1. Chain 1 and turn.
2. Insert your hook under the front loop only of the first stitch.
3. Yarn over and pull up a loop (two loops on hook).
4. Yarn over again and pull through both loops on the hook.
5. Repeat across the row.
6. Turn and repeat for as many rows as desired.
This creates a smooth surface on the front and a horizontal ridge on the back of your fabric.
Found this helpful?
Share it with a friend or save it for your next crochet session!


Front Loop Only Half Double Crochet (FLO hdc)
1. Chain 2 and turn.
2. Yarn over, insert your hook under the front loop only of the next stitch.
3. Yarn over and pull up a loop (three loops on hook).
4. Yarn over again and pull through all three loops.
5. Repeat across the row.
6. Turn and continue working in FLO for additional rows.
This stitch adds flexibility and a soft, ribbed texture, perfect for scarves or hat brims.
Found this helpful?
Share it with a friend or save it for your next crochet session!

Front Loop Only Double Crochet (FLO dc)
1. Chain 3 and turn (counts as your first dc).
2. Yarn over, insert your hook under the front loop only of the next stitch.
3. Yarn over and pull up a loop (three loops on hook).
4. Yarn over, pull through two loops (two loops remain).
5. Yarn over again and pull through the final two loops.
6. Continue across the row and turn.
FLO double crochet creates a light, drapey fabric with elegant ridges along the back—beautiful for blankets, wraps, or garments.
Step 5: Repeat and Observe the Texture
Continue crocheting in the front loop only for several rows. You’ll notice a horizontal ridge appearing on the back side of your work. The front remains flat and smooth.
This texture gives your crochet pieces a bit of movement and flexibility, and when combined with BLO rows, it can create stunning ribbed or wave-like designs.
Found this helpful?
Share it with a friend or save it for your next crochet session!
Limited-Time Deals
Promotions & Special Bundles
Take advantage of our maker promotions, volume discounts, and instant digital downloads.
Website Direct Sale
Ends: Promotion ends :
35% Raverly Sale
Unlock row-by-row blankets, botanical squares, and wearable patterns with instant PDF delivery.
APPLY COUPON AT CHECKOUT:
No code needed
Etsy Store Exclusive
Save 30% Auto
PROMO CODE : STOUTO30OFF
Get 30% off any flower motifs, throw blankets, or cushion patterns on Etsy. Use Promocode .
Open Etsy Store
Over 847 ★★★★★ reviews
Direct PDF Perks
Lifetime Access
VIP Maker Direct Delivery Guarantee
- Instant PDF download link right after purchase
- Formatted for home printing & tablet row-checkers
- Free errata notifications and chart expansions
Practice Example
Practice Example
.
Practice the FLO Stitch
Ready to give the Front Loop Only stitch a try?
Practice it in a small swatch using single crochet or half double crochet. This will help you get comfortable spotting the front loop and maintaining tension.
The Front Loop Only (FLO) crochet stitch is a simple yet powerful way to add texture and dimension to your projects. With just one small change in where you insert your hook, you can completely transform the look and feel of your crochet fabric.
It’s easy to learn, beginner-friendly, and opens the door to endless creative possibilities—perfect for blankets, garments, and decorative projects alike.
Crochet Stitch Tutorials
CROCHET STITCH
Front loop only
stouto.co.za • Stouto Creative Crochet
Save for Later
Sharing is Caring
Love These Patterns? Share & Pin for Later!
Save this pattern hub to your favorite Pinterest boards, share with your crochet circle on Facebook, or copy the link for your next crafting weekend. Every share helps support independent artisan design!
Quick Social Sharing Links
Help fellow yarn enthusiasts discover tested row-by-row guides, free pattern downloads, and mindful crochet inspiration with one click:
Bookmark Tip: Press Ctrl + D / Cmd + D to save anytime.
#StoutoCreativeCrochet #CrochetStitches #StitchTutorials #Frontlooponly
FAQ
Frequently Asked Questions
Questions & Answers
What does FLO mean in crochet?
FLO stands for Front Loop Only, meaning you work your stitch into the front loop of each stitch instead of both loops.
How do you crochet in the front loop only?
Insert your hook under the front loop (the loop closest to you), yarn over, and complete the stitch as usual.
Why use the front loop stitch?
It adds decorative ridges and flexibility to crochet fabric, ideal for textured or ribbed designs.
What is the difference between FLO and BLO?
FLO uses the front loop, creating ridges on the back. BLO uses the back loop, creating ridges on the front.
Is the FLO stitch beginner-friendly?
Yes! It’s a simple variation of basic stitches and easy to master once you can identify stitch loops.
What projects can I make with FLO crochet?
Try FLO for hats, cuffs, dishcloths, or textured blankets.
Does FLO affect the stretch of crochet fabric?
Yes !, FLO gives the fabric a little more drape and flexibility.
Can I use FLO with any crochet stitch?
Absolutely! You can work FLO with single, half double, or double crochet stitches.
What does FLO texture look like?
It creates a flat front and a ridged back, adding a soft texture.
How can I combine FLO and BLO stitches?
Alternate rows or stitches of FLO and BLO for a wavy, ribbed texture perfect for modern crochet patterns.

About the Designer
Hi, I'm Linda, the designer behind Stouto Creative Crochet. I create original crochet patterns inspired by colour, texture, and the joy of handmade crafts.
Each pattern is personally designed, written, tested, and photographed to provide clear instructions and an enjoyable crochet experience. My goal is to help crocheters of all skill levels create beautiful projects they can be proud of.
Discover more crochet patterns, tutorials, and creative resources from Stouto Creative Crochet.
Affiliate Partners & Maker Resources
Favorite Yarns, Craft Partners & Recommended Blogs
Discover our trusted yarn mills, partner craft platforms, and inspiring crochet friends. When you shop through these links, you support Stouto Creative Crochet at no extra cost to you.
Transparent Disclosure: We only partner with platforms and yarn makers we genuinely use and love.
Official Partner

LoveCrafts.com
Marketplace & Yarn HubShop pattern-matched yarn bundles, Stylecraft Special DK, Paintbox Yarns, and hooks with worldwide delivery.
Pattern Community
Ravelry Store
Digital Pattern LibraryAdd Stouto patterns straight to your personal digital library, track project queues, and view thousands of community project photos.
Featured Craft Blog
FreeCrochetDesigns.com
Partner Blog & GuidesExplore weekly free pattern roundups, stitch tutorials, and guest designer spotlights curated by our sister craft blog.
Star Seller
Stouto on Etsy
Maker MarketplaceBrowse automatic multi-buy discounts, over 750 maker reviews, and instant printable downloads.
Featured Maker Blogs & Community Friends:
#StoutoCreativeCrochet
Join Our Crochet Community
We love seeing what you create! Share photos of your finished crochet projects or works in progress on my Facebook page and connect with fellow crocheters who love handmade creativity as much as you do. Start exploring today, grab your hook, and enjoy crocheting patterns that inspire, relax, and delight, one crochet stitch at a time.