
Artisan Stitch Tutorial • Published:
Magic Ring
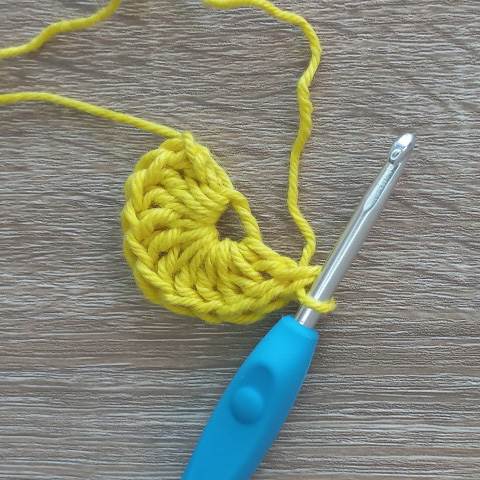
Crocheting in the round is a foundational skill, but starting with a simple chain ring often leaves a noticeable hole in the center. The Magic Ring solves this problem by creating an adjustable loop you can tighten, leaving a neat, professional finish.
PATTERNS AVAILABLE ACROSS OFFICIAL STORES:
ABOUT
About
.
The Magic Ring (or Circle) allows you to start crochet in the round without leaving a hole in the center. Perfect for granny squares, amigurumi, and circular motifs.
Whether you're making small motifs like flowers, circles, or large amigurumi projects, the Magic Ring is essential. It’s especially helpful when creating a tight center for circular patterns. This technique works with single crochet, double crochet, or any stitch called for in the first round of your pattern.
TERMINOLOGY DECODED
US vs. UK Stitch Translation Matrix
Never let terminology ruin a project. In US terms, stitches are named after the yarn overs; in UK terms, stitches are named after the loops on your hook.
US vs. UK Stitches
Horizontal Scroll Supported
| Symbol / Chart | Stitch Name | UK Equivalent | Quick Method |
|---|---|---|---|
STEP-BY-STEP CROCHET GUIDE
How to Work the Stitch: Step-by-Step
Browse through each row below or follow along round-by-round at your own pace.
Easy steps on how to make a crochet magic loop for working in the round
Start with a magic ring,
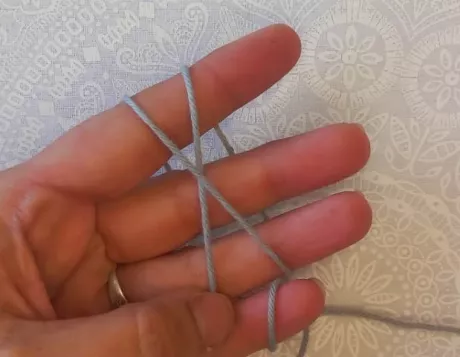
Form a loop with your yarn. loop the yarn around your fingers so that the yarn you are working with, lies on the right while the "tail" of the yarn lies on the left.
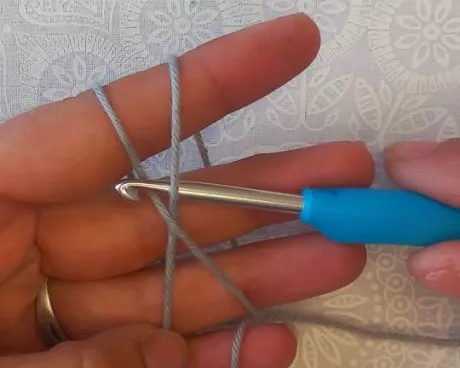
Insert the hook through the loop, and slide the crochet hook under both pieces of yarn from right to left.
Use the hook tip to hook onto a portion of yarn from the working end (yarn attached to the ball) of the yarn.
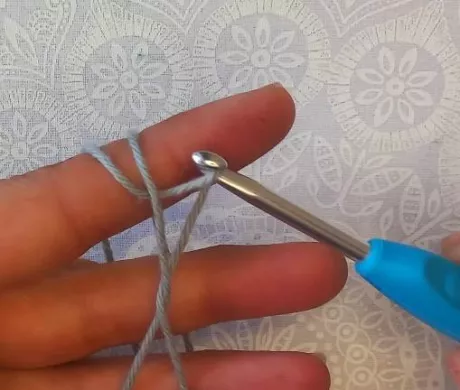
Pull the yarn through the ring to create another loop on your hook, this does not count as your first stitch.
Chain stitch.
Try to leave a workable tail end, as it helps secure the yarn when weaving in ends.
Limited-Time Deals
Promotions & Special Bundles
Take advantage of our maker promotions, volume discounts, and instant digital downloads.
Website Direct Sale
Ends: Promotion ends :
35% Raverly Sale
Unlock row-by-row blankets, botanical squares, and wearable patterns with instant PDF delivery.
APPLY COUPON AT CHECKOUT:
No code needed
Etsy Store Exclusive
Save 30% Auto
PROMO CODE : STOUTO30OFF
Get 30% off any flower motifs, throw blankets, or cushion patterns on Etsy. Use Promocode .
Open Etsy Store
Over 847 ★★★★★ reviews
Direct PDF Perks
Lifetime Access
VIP Maker Direct Delivery Guarantee
- Instant PDF download link right after purchase
- Formatted for home printing & tablet row-checkers
- Free errata notifications and chart expansions
Practice Example
Practice Example
.
Step-by-Step Practice Example:
1. Wrap yarn around your index finger to form a loop.
2. Hold loop with thumb and middle finger, leaving the yarn tail hanging.
3. Insert hook into the loop, yarn over, pull through.
4. Chain 1 (or as required by pattern) to secure the first stitch.
5. Crochet the specified number of stitches into the loop.
6. Pull the yarn tail to tighten the loop.
7. Slip stitch into the first stitch to join the round if needed.
Beginner Tips
- Leave a long enough tail (10–15 cm / 4–6 inches) so it is easy to weave in later.
- Pull the tail slowly to avoid breaking the yarn.
- If the centre doesn't close, make sure you're pulling the short yarn tail, not the working yarn.
- Weaving the tail back and forth after tightening helps prevent the centre from opening over time.
Magic Ring Alternative
If you find the magic ring difficult, you can chain 4, join with a slip stitch to form a ring, and work the first round into the center of the ring. The center opening will be slightly larger than a magic ring
Crochet Stitch Tutorials
CROCHET STITCH
Magic Ring
stouto.co.za • Stouto Creative Crochet
Save for Later
Sharing is Caring
Love These Patterns? Share & Pin for Later!
Save this pattern hub to your favorite Pinterest boards, share with your crochet circle on Facebook, or copy the link for your next crafting weekend. Every share helps support independent artisan design!
Quick Social Sharing Links
Help fellow yarn enthusiasts discover tested row-by-row guides, free pattern downloads, and mindful crochet inspiration with one click:
Bookmark Tip: Press Ctrl + D / Cmd + D to save anytime.
#StoutoCreativeCrochet #CrochetStitches #StitchTutorials #MagicRing
FAQ
Frequently Asked Questions
Can I use a Magic Ring for any stitch?
Yes, it works with single crochet, double crochet, or other stitches.
Do I need to pull it tight?
Always pull tight to close the loop, leaving no hole.
Is Magic Ring the same as Magic Circle?
Yes, they are different names for the same technique.

About the Designer
Hi, I'm Linda, the designer behind Stouto Creative Crochet. I create original crochet patterns inspired by colour, texture, and the joy of handmade crafts.
Each pattern is personally designed, written, tested, and photographed to provide clear instructions and an enjoyable crochet experience. My goal is to help crocheters of all skill levels create beautiful projects they can be proud of.
Discover more crochet patterns, tutorials, and creative resources from Stouto Creative Crochet.
Affiliate Partners & Maker Resources
Favorite Yarns, Craft Partners & Recommended Blogs
Discover our trusted yarn mills, partner craft platforms, and inspiring crochet friends. When you shop through these links, you support Stouto Creative Crochet at no extra cost to you.
Transparent Disclosure: We only partner with platforms and yarn makers we genuinely use and love.
Official Partner

LoveCrafts.com
Marketplace & Yarn HubShop pattern-matched yarn bundles, Stylecraft Special DK, Paintbox Yarns, and hooks with worldwide delivery.
Pattern Community
Ravelry Store
Digital Pattern LibraryAdd Stouto patterns straight to your personal digital library, track project queues, and view thousands of community project photos.
Featured Craft Blog

FreeCrochetDesigns.com
Partner Blog & GuidesExplore weekly free pattern roundups, stitch tutorials, and guest designer spotlights curated by our sister craft blog.
Star Seller
Stouto on Etsy
Maker MarketplaceBrowse automatic multi-buy discounts, over 750 maker reviews, and instant printable downloads.
Featured Maker Blogs & Community Friends:
#StoutoCreativeCrochet
Join Our Crochet Community
We love seeing what you create! Share photos of your finished crochet projects or works in progress on my Facebook page and connect with fellow crocheters who love handmade creativity as much as you do. Start exploring today, grab your hook, and enjoy crocheting patterns that inspire, relax, and delight, one crochet stitch at a time.