

Artisan Stitch Tutorial • Published:
Ultimate Stitch Sampler Blanket – Photo References for Rows 0–15
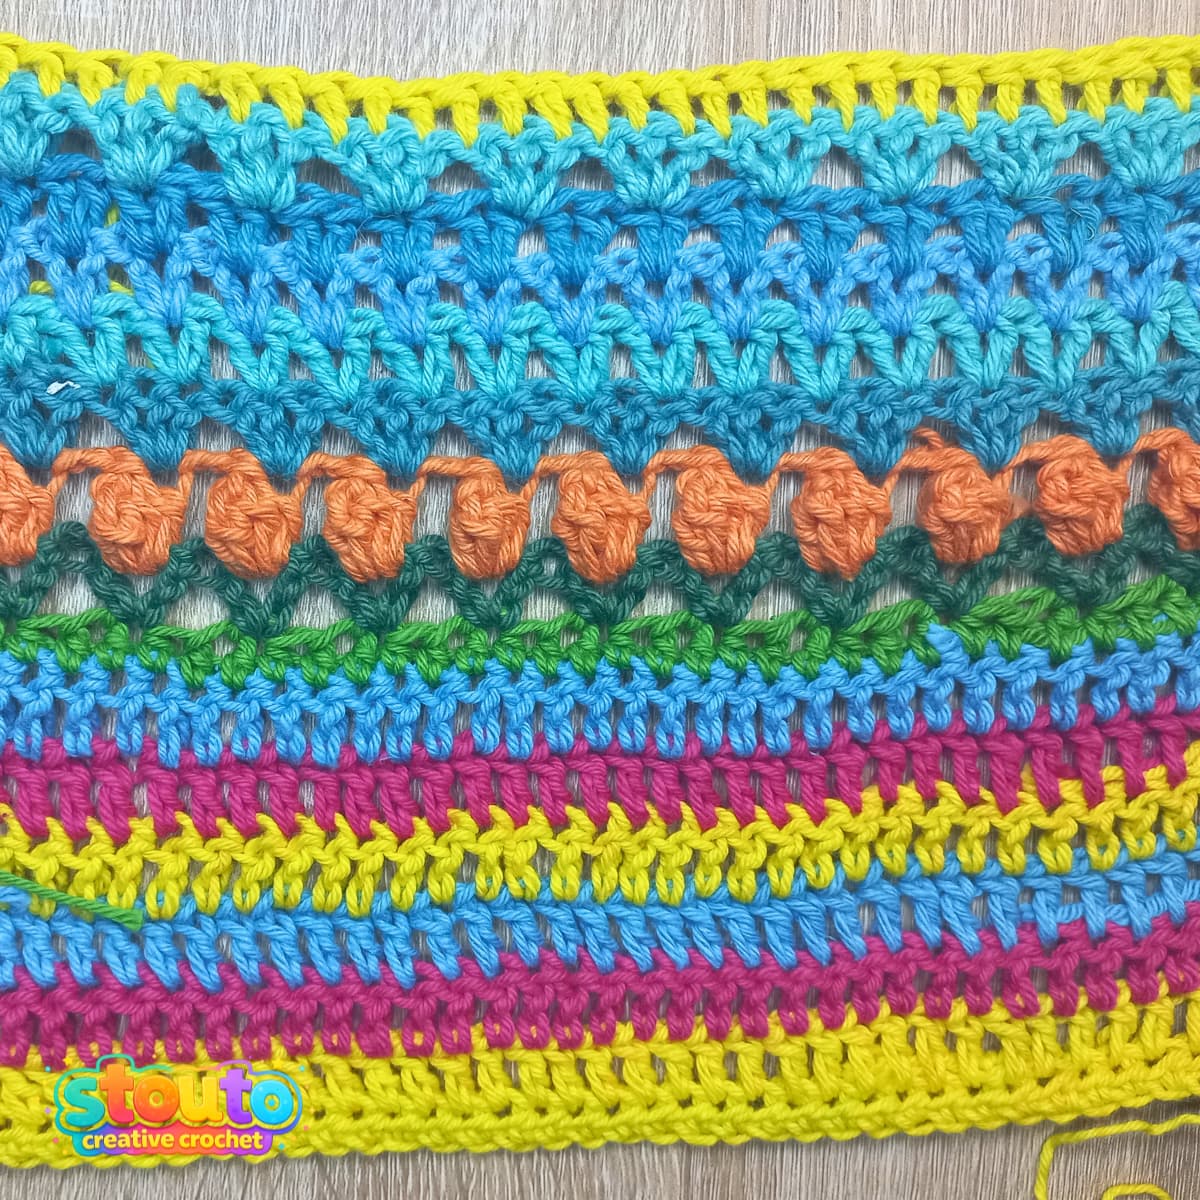
Stitch Sampler Blanket row-by-row photo guide
Stouto Crochet Tutorial
The photo reference guide for Rows 0–15 of the Ultimate Stitch Sampler Blanket is designed to help you follow the written crochet instructions, understand stitch placement, and check your work as you progress through the first section of your blanket.
This guide provides additional visual explanations for beginners who may need help understanding chain counts, joining new yarn colours, working into the first and last stitches of a row, and following pattern repeats.
The photographs are a supporting resource, not a replacement for the written pattern or stitch diagrams. More experienced crocheters can use them as a quick reference whenever they need to check a particular technique.
PATTERNS AVAILABLE ACROSS OFFICIAL STORES:
ABOUT
.
Before You Start: Choosing Your Blanket Size
- 1. Choose Your Blanket Size - Select the blanket size you want to make using the size table in the main pattern. If you are a beginner, consider starting with a smaller size to practise the stitch patterns before attempting a larger blanket.
- Understand the Stitch Count - The required number of stitches per row determines the intended width of your blanket. Use the stitch count specified for your chosen size in the pattern table.
- Make the Foundation Chain - Chain the number specified for your chosen blanket size. Then chain 2 additional stitches and work 1 half double crochet (hdc) into the fourth chain from the hook.
- Complete the First Row - The initial chain loop counts as your first hdc stitch. Work 1 hdc into each remaining foundation chain, following the main pattern's instructions for your selected size.
Important: Do not fasten off your yarn colour after completing the foundation row. Chain 3 as instructed; this is the chain 3 referred to at the beginning of Row 1 in the written pattern.
TERMINOLOGY DECODED
US vs. UK Stitch Translation Matrix
Never let terminology ruin a project. In US terms, stitches are named after the yarn overs; in UK terms, stitches are named after the loops on your hook.
US vs. UK Stitches
Horizontal Scroll Supported
| Symbol / Chart | Stitch Name | UK Equivalent | Quick Method |
|---|---|---|---|
| ch | Chain Stitch | chain (ch) |
Make a slipknot, yo, pull through loop. Repeat for desired chains. |
| hdc | Half Double Crochet | half treble crochet (htr) |
1. Yarn over. |
| dc | Double Crochet | treble crochet (tr) |
1. Yarn over. |
| pc | Popcorn Stitch | popcorn stitch (pc) |
1. Work 5 DC in same stitch. |
| v st | V Stitch | V-stitch (v st) |
1. Work dc, ch1, dc into same stitch/space. |
| 2dc | 2 Double Crochet | 2 treble crochet (2tr) |
1. Work 1 dc into the stitch (complete as usual). |
| 3dc | 3 Double Crochet | 3 treble crochet (3tr) |
1. Work 3 dc into the same stitch (one after the other). |
| sp before | Space Before | space before (sp before) |
Insert hook in space before marked stitch. |
| sp after | Space After | space after (sp after) |
Insert hook in space after marked stitch. |
| rep from * | Repeat from * | repeat from * (rep from *) |
1) Find the *. |
| rep rows | Repeat Rows | repeat rows (rep rows) |
Work rows as written for repetition count. |
TUTORIALS MADE EASY
.
Understanding the Stitch Diagrams
The stitch diagrams for Rows 1–25 do not show the foundation chain and initial hdc row described above. These steps are completed before you begin following the stitch diagrams.
For additional visual assistance, refer to the photo guide provided after the border instructions in the complete pattern. The photo references are organised into sections corresponding to the written pattern, making it easier to locate the row you are working on.
Clarifying the Foundation Row Instructions
Before starting Row 1, you need to make the foundation chain and work the first row of half double crochet (hdc) stitches. This foundation row establishes the width of your blanket and is worked before following the stitch diagrams.
Step 1: Choose Your Blanket Size
Choose your preferred blanket size from the size table in the main pattern. The table specifies the number of foundation chains required for that size.
Step 2: Make the Foundation Chain
Chain the number of stitches specified in the pattern for your chosen blanket size.
Important:The number of chains you make determines the number of hdc stitches in your foundation row, according to the instructions below.
Step 3: Add Two Extra Chains
After completing the required foundation chain, chain 2 additional stitches.
These extra chains position your hook at the correct height to begin working the first half double crochet stitch.
Step 4: Work the First Half Double Crochet
Insert your hook into the **fourth chain from the hook** and work 1 hdc stitch.
The two additional chains, together with the starting chain loop, position the work correctly. The first hdc you make in the fourth chain is the first counted stitch of your foundation row.
Step 5: Complete the Foundation Row
Work 1 hdc into each remaining foundation chain until you reach the beginning of the row.
Count your stitches and check that you have the number required for your selected blanket size.
Step 6: Prepare for Row 1
**Do not fasten off your yarn.**
Chain 3 as instructed. This chain 3 forms the starting chain for Row 1 of the written pattern and counts as the first double crochet (dc) stitch.
You are now ready to begin following the written instructions and stitch diagrams for Row 1.
Important Note About the Stitch Diagrams
The stitch diagrams for Rows 1–25 do not show the foundation chain or the initial hdc row described above. These steps must be completed first.
Use the written pattern for the foundation instructions, then refer to the corresponding photo references to help you follow each subsequent row.
Photo Guide: Rows 1–15
Use the following notes alongside the written pattern and the corresponding photographs. Pay particular attention to the beginning and end of each row, as mistakes in these areas can affect the alignment of your blanket.
Working with New Colours and Row Starts
Joining a New Colour
- Start each new row at the top of the last stitch worked.
- Join the new colour with a slip stitch (sl st), following the pattern instructions.
- Work 1 single crochet (sc) over the loose yarn tails where appropriate to secure them as you begin the row.
- You can weave in or crochet over your yarn tails as you work to reduce finishing later.
Understanding the Starting Chain
At the beginning of each row, follow the chain instructions given in the written pattern.
For example, when a row begins with (ch 3), chain 3 as instructed. This chain counts as the first double crochet (dc) stitch for that row.
Continue following the written instructions for the pattern repeat, and remember to work into the final stitch of the row. For Row 2, this includes working into the top of the starting chain from the previous row, as specified in the pattern.
Important: Always check the first and last stitches of every row. Missing the final stitch or working into the wrong chain can cause your blanket edges to become uneven.
How to Work Over Yarn Tails
To minimise loose ends:
- Position the yarn tail along the top of the previous row, behind your work.
- Work the next stitches over the tail, enclosing it within the stitches.
- Continue for a short distance to secure the tail.
- Trim any remaining excess only when you are satisfied that it is secure.
This technique is particularly useful when changing colours frequently throughout a stitch sampler blanket.
How to Fasten Off a Colour
When the pattern instructs you to finish a colour:
- Cut the yarn, leaving a tail long enough to weave in securely.
- Pull the cut end completely through the loop on your hook.
- Tighten the loop gently to secure the yarn.
- Weave in the remaining tail, taking care not to distort the stitches.
Follow the colour changes specified in the written pattern rather than fastening off at the end of every row.
STEP-BY-STEP CROCHET GUIDE
Step-by-Step
Browse through each row below or follow along round-by-round at your own pace.
Common Mistakes to Watch For
Missing the Last Stitch
The final stitch may be worked into the top of a starting chain rather than a regular stitch. Check the instructions for each row.
Ignoring Skipped Stitches
Skipped stitches are often essential to the design. Follow the written pattern and diagram rather than filling every available stitch.
Incorrect Starting Chains
Starting chains may count as stitches, depending on the row instructions. Always check the written pattern before beginning.
Losing Track of the Pattern Repeat
Stitches written before or after an asterisk repeat may be required only once. Read the complete row instruction before starting.
Understanding Asterisks and Pattern Repeats
In crochet patterns, an asterisk (*) marks the beginning of a sequence that must be repeated as directed.
Instructions written before or after the repeated section may apply only once. These stitches are important because they establish the beginning and end of the row.
For example, if a row begins with a chain followed by an instruction to repeat a sequence between asterisks, complete the starting chain first, repeat the specified sequence as directed, and then work any final stitches written after the repeat.
Always read the complete row instruction before starting so that you know where the repeat begins and ends.
Continue to Rows 16–26
Once you have completed Row 15, checked your stitch count, and confirmed that your blanket edges are aligned, continue to the next photo reference section.
Use the written pattern as your primary guide and refer to the photographs whenever you need additional help identifying a stitch, understanding a repeat, or checking your work.
Next tutorial: Ultimate Stitch Sampler Rows 16–26 | Photo Guide
Crochet articles

CROCHET NOTES ON
Ultimate Stitch Sampler Blanket – Photo References for Rows 0–15
stouto.co.za • Stouto Creative Crochet
Save for Later
Sharing is Caring
Love These Patterns? Share & Pin for Later!
Save this pattern hub to your favorite Pinterest boards, share with your crochet circle on Facebook, or copy the link for your next crafting weekend. Every share helps support independent artisan design!
Quick Social Sharing Links
Help fellow yarn enthusiasts discover tested row-by-row guides, free pattern downloads, and mindful crochet inspiration with one click:
Bookmark Tip: Press Ctrl + D / Cmd + D to save anytime.
#StoutoCreativeCrochet #CrochetTutorials #UltimateStitchSamplerBlanket–PhotoReferencesforRows0–15
Limited-Time Deals
Promotions & Special Bundles
Take advantage of our maker promotions, volume discounts, and instant digital downloads.
Website Direct Sale
Ends: Promotion ends :
35% Raverly Sale
Unlock row-by-row blankets, botanical squares, and wearable patterns with instant PDF delivery.
APPLY COUPON AT CHECKOUT:
No code needed
Etsy Store Exclusive
Save 30% Auto
PROMO CODE : STOUTO30OFF
Get 30% off any flower motifs, throw blankets, or cushion patterns on Etsy. Use Promocode .
Open Etsy Store
Over 847 ★★★★★ reviews
Direct PDF Perks
Lifetime Access
VIP Maker Direct Delivery Guarantee
- Instant PDF download link right after purchase
- Formatted for home printing & tablet row-checkers
- Free errata notifications and chart expansions
EXPAND YOUR STITCH REPERTOIRE
View All Stitch Guides →
Explore More Crochet Tutorials on the Website

Beginner’s Guide to the Chain Stitch & Chain Space in Crochet
- Chain Stitch (CH) : The basic stitch that forms the starting foundation and decorative loops in crochet.
- Chain Space (CH-SP) : The gap made by chaining a number of stitches and skipping stitches (or joining into a chain). Used in mesh, lace, granny squares, and decorative designs.
EXPLORE PATTERNS
View All Crochet Patterns →
Related Patterns

FAQ
Frequently Asked Questions
Why do the stitch diagrams start differently from my foundation row?
The diagrams for Rows 1–25 do not include the foundation chain and initial hdc row. Complete the foundation steps described at the beginning of the pattern before following the diagrams.
Why does my blanket edge look uneven?
Common causes include missing the final stitch, working into the wrong chain, or overlooking skipped stitches. Check the beginning and end of each row against the written instructions.
Should I follow the photo guide or the written pattern?
The written pattern is your primary reference. The photographs provide additional visual help when you need to check stitch placement, technique, or the appearance of a completed row.
Can I crochet over my yarn tails?
Yes. Where practical, you can work over yarn tails as you crochet to reduce the amount of finishing required. Secure any remaining ends carefully to prevent them from coming loose.
What should I do if my stitch count is incorrect?
Stop and recount your stitches before continuing. Check the starting chain, skipped stitches, pattern repeats, and final stitch. Correcting the mistake early will help prevent it from affecting later rows.

About the Designer
Hi, I'm Linda, the designer behind Stouto Creative Crochet. I create original crochet patterns inspired by colour, texture, and the joy of handmade crafts.
Each pattern is personally designed, written, tested, and photographed to provide clear instructions and an enjoyable crochet experience. My goal is to help crocheters of all skill levels create beautiful projects they can be proud of.
Discover more crochet patterns, tutorials, and creative resources from Stouto Creative Crochet.
Affiliate Partners & Maker Resources
Favorite Yarns, Craft Partners & Recommended Blogs
Discover our trusted yarn mills, partner craft platforms, and inspiring crochet friends. When you shop through these links, you support Stouto Creative Crochet at no extra cost to you.
Transparent Disclosure: We only partner with platforms and yarn makers we genuinely use and love.
Official Partner

LoveCrafts.com
Marketplace & Yarn HubShop pattern-matched yarn bundles, Stylecraft Special DK, Paintbox Yarns, and hooks with worldwide delivery.
Pattern Community
Ravelry Store
Digital Pattern LibraryAdd Stouto patterns straight to your personal digital library, track project queues, and view thousands of community project photos.
Featured Craft Blog

FreeCrochetDesigns.com
Partner Blog & GuidesExplore weekly free pattern roundups, stitch tutorials, and guest designer spotlights curated by our sister craft blog.
Star Seller
Stouto on Etsy
Maker MarketplaceBrowse automatic multi-buy discounts, over 750 maker reviews, and instant printable downloads.
Featured Maker Blogs & Community Friends:
#StoutoCreativeCrochet
Join Our Crochet Community
We love seeing what you create! Share photos of your finished crochet projects or works in progress on my Facebook page and connect with fellow crocheters who love handmade creativity as much as you do. Start exploring today, grab your hook, and enjoy crocheting patterns that inspire, relax, and delight, one crochet stitch at a time.