
Artisan Stitch Tutorial • Published:
Beginner's Guide to Flower Granny Squares | Learn How to Crochet Floral Granny Squares
Beginner's Guide to Flower Granny Squares – Learn Every Technique
Stouto Crochet Tutorial
Learn everything you need to know about crocheting flower granny squares. This complete beginner's guide covers the magic ring, changing colours, joining yarn, blocking, weaving in ends, stitch counting, and helpful crochet tips to help you create beautiful floral granny squares with confidence.
PATTERNS AVAILABLE ACROSS OFFICIAL STORES:
ABOUT
.
Beginner's Guide to Flower Granny Squares
Flower granny squares are one of the most enjoyable crochet motifs to make. They combine beautiful floral centres with classic granny square construction, making them perfect for blankets, cushions, bags, scarves, garments, and home décor.
Whether you're making your very first granny square or adding another floral design to your collection, this guide will walk you through the techniques, tips, and best practices that every crocheter should know before getting started.
What is a Flower Granny Square?
A flower granny square is a crochet square with a flower motif incorporated into the center or main design.
Unlike a traditional granny square, which usually begins with groups of double crochet stitches worked into a center ring, a flower granny square begins with a floral motif. The following rounds then transform the circular flower into a square shape.
This gives you two distinct parts:
Flower center → square border
The flower may be flat, textured, raised, layered or made with several colors depending on the pattern.
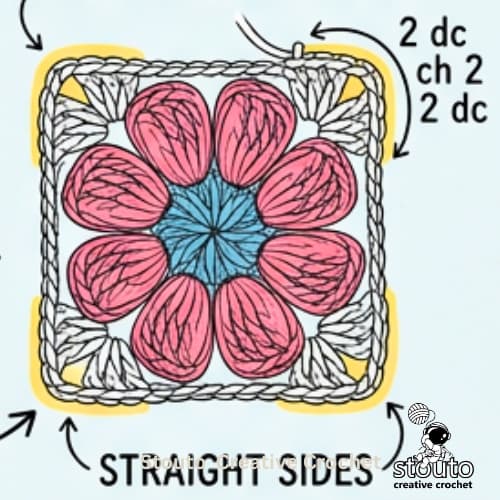
Once the flower has been created, additional crochet rounds are used to establish the four corners and four straight sides of the square.
Flower granny squares are popular because they are:
- Beginner friendly
- Portable projects
- Great for using leftover yarn
- Easy to customise with colours
- Perfect for joining into larger projects
Common projects include:
- Blankets
- Throws
- Baby blankets
- Cushion covers
- Bags
- Table runners
- Shawls
- Wall hangings
- Garments
- Seasonal decorations
What You Will Learn
This beginner's guide will help you understand:
- What a flower granny square is
- How flower granny squares are constructed
- The basic crochet stitches used
- How to start a flower motif
- How to create crochet flower petals
- How to turn a flower into a square
- How to change colors
- How to keep your squares the same size
- How to block flower granny squares
- How to join granny squares
- What you can make with flower granny squares
- Where to find free Stouto flower granny square patterns
Helpful Tips
- Keep your tension relaxed and even.
- Don't pull colour changes too tightly.
- Compare each completed round with the pattern photos.
- Use stitch markers to identify corners.
- Count your stitches often.
- Weave in ends as you finish each square instead of waiting until the end.
- Keep all squares made with the same hook size and yarn weight for consistent sizing.
Common Beginner Mistakes
Don't worry if your first few squares aren't perfect, every crocheter learns through practice.
Common mistakes include:
- Missing corner stitches
- Adding extra stitches
- Forgetting to count stitches
- Working into the wrong chain space
- Pulling colour changes too tightly
- Forgetting to weave in yarn tails securely
- Skipping blocking before joining squares
Each finished square helps improve your crochet skills.
WHAT YOU WILL NEED
.
What You Need to Crochet Flower Granny Squares
You don't need a large collection of supplies to get started.
Basic materials
- Yarn
- Crochet hook
- Scissors
- Yarn needle
- Stitch markers, optional
- Blocking mat and pins, optional
For beginners, a smooth yarn with good stitch definition is particularly helpful because it makes it easier to see where to place your hook.
Cotton and cotton-blend yarns are especially useful for floral granny squares because they show stitch definition clearly and hold their shape well.
The exact yarn weight and crochet hook size will depend on the individual pattern.
TERMINOLOGY DECODED
US vs. UK Stitch Translation Matrix
Never let terminology ruin a project. In US terms, stitches are named after the yarn overs; in UK terms, stitches are named after the loops on your hook.
US vs. UK Stitches
Horizontal Scroll Supported
| Symbol / Chart | Stitch Name | UK Equivalent | Quick Method |
|---|---|---|---|
| ch | Chain Stitch | chain (ch) |
Make a slipknot, yo, pull through loop. Repeat for desired chains. |
| sl st | Slip Stitch | slip stitch (sl st) |
1. Insert hook into the stitch or space. |
| sc | Single Crochet | double crochet (dc) |
1. Insert hook into the next stitch. |
| hdc | Half Double Crochet | half treble crochet (htr) |
1. Yarn over. |
| dc | Double Crochet | treble crochet (tr) |
1. Yarn over. |
| tr | Treble Crochet | double treble crochet (dtr) |
1. Yarn over twice. |
| MR | Magic Ring | magic circle (MC) |
1. Wrap yarn around your fingers to form a loop. |
TUTORIAL NOTES
Pattern Notes
Keeping Your Square Flat
A well-made granny square should lie flat without curling or ruffling.
If your square curls:
- Your stitches may be too tight.
- Try using a larger crochet hook.
- Relax your tension.
If your square ruffles:
- Your tension may be too loose.
- You may have accidentally added extra stitches.
- Double-check every stitch count.
Finishing Off
When the square is complete:
- Cut the yarn leaving a 10–15 cm (4–6 inch) tail.
- Yarn over and pull the tail completely through the loop.
- Pull gently to tighten.
- Thread the tail onto a yarn needle.
- Weave the tail through several stitches on the back.
- Reverse direction once for extra security.
- Trim the excess yarn close to the fabric.
Repeat for all remaining yarn tails.
How to Change Colors in Flower Granny Squares
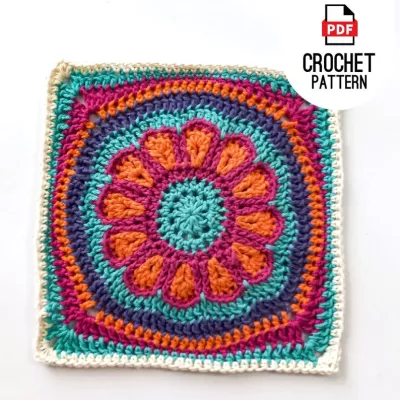
Color changes are one of the most appealing features of flower granny squares.
You can use:
- One color for the center
- A second color for the petals
- A third color for the flower border
- A contrasting color for the outer square
- Multiple colors for a patchwork effect
Simple color planning
Try thinking about your square as three sections:
Center color - The center of the flower.
Petal colors - The main floral section.
Background color
- The color that turns the flower into a square.
- This makes color planning much easier.
How to Choose Colors for Flower Granny Squares
Flower granny squares give you plenty of opportunities to experiment.
For a traditional look, choose bright contrasting colors.
For a modern look, try:
- Cream + sage + dusty pink
- Natural + terracotta + mustard
- White + lavender + green
- Navy + blue + soft yellow
- Neutral + one accent color
You can also use leftover yarn to create a colorful scrap blanket.
The same flower pattern can look completely different simply by changing the colors.
Why Are My Flower Granny Squares Different Sizes?
If one square is noticeably larger or smaller than another, check:
- Yarn - Different yarn weights can change the finished size.
- Hook - A larger hook generally creates larger stitches.
- Tension - Tight crochet produces smaller stitches, while loose crochet produces larger stitches.
- Stitch count - Missing or adding stitches can change the shape and size.
- Number of rounds - Make sure every square has been worked to the same final round unless the pattern specifically calls for different sizes.
Step by step - Join a new color for flower granny squares
Many flower granny squares use multiple colors.
When the pattern says Join yarn, use this method:
- Insert your hook into the stitch or space indicated.
- Make a slip knot with the new yarn.
- Place the loop on your hook.
- Pull the loop through the stitch.
- Chain the number instructed in the pattern.
- Continue crocheting as written.
Tip: Leave a 10–15 cm (4–6 inch) yarn tail for weaving in later.

Step by step - Changing colors for flower granny squares
For the neatest color change:
- Work the stitch until two loops remain on your hook.
- Drop the old colour.
- Yarn over with the new colour.
- Pull through the remaining loops.
- Continue crocheting with the new colour.
This creates a clean, professional-looking colour transition.
How to Keep Flower Granny Squares the Same Size
If you are making a blanket, consistency is extremely important.
Every square needs to be approximately the same size before joining.
To improve consistency:
1. Use the same yarn weight for every square.
2. Use the same crochet hook size.
3. Maintain consistent tension.
4. Follow the same number of rounds.
5. Block the squares before joining when necessary.
Different yarn brands can also produce slightly different results, even when they are labelled as the same weight.
Working Into Chain Spaces
Unless otherwise stated:
- Insert your hook into the chain space, not into the individual chain stitches.
- This makes the square easier to crochet and creates a neater finish.
Counting Your Stitches
After every round:
- Count your stitches before fastening off.
- Make sure every corner has the correct stitch count.
- Fix mistakes immediately before continuing.
Taking a few seconds to count stitches after each round can save a lot of time later.
Joining Flower Granny Squares
Once you've completed several squares, they can be joined in many different ways.
Popular joining methods include:
- Slip Stitch Join
- Single Crochet Join
- Flat Slip Stitch Join
- Join-As-You-Go (JAYG)
- Invisible Seam
- Whip Stitch
- Mattress Stitch
Each method creates a different decorative finish, so choose the one that best suits your project.
Weaving in Yarn Tails
For the most secure finish:
- Weave each tail in three different directions whenever possible.
- Avoid weaving only through open chain spaces.
- Hide tails inside stitches of the same colour.
- Stretch the square gently before trimming the yarn.
Properly woven ends help ensure your project stays beautiful for years.

How to Block Flower Granny Squares
Blocking can help your squares become more uniform and make the corners and edges easier to join.
To block a square:
- Lightly dampen the finished square.
- Gently stretch it into shape.
- Align the four corners.
- Straighten the four sides.
- Pin the square into place if using a blocking board.
- Allow it to dry completely.
- Remove the pins.
Blocking is particularly useful when making a blanket from many individual flower granny squares.
How to Join Flower Granny Squares
Once you have made enough squares, they can be joined together to create a larger project.
Popular joining methods include:
Slip stitch join - Creates a secure crochet seam and can add a decorative ridge.
Single crochet join - Creates a more pronounced raised seam between squares.
Whip stitch - A simple sewing method using a yarn needle.
Join-as-you-go - Allows you to join squares while crocheting the final round.
There is no single "correct" joining method. Choose the technique that gives you the look and finish you want.
How Many Flower Granny Squares Do I Need?
The number of squares depends on the size of the finished square and the size of your project.
For example:
- Small baby blanket | 4 × 5 squares
- Lap blanket | 5 × 6 squares
- Small throw | 6 × 7 squares
- Large blanket | 8 × 10 squares
These are only examples. Your finished dimensions will depend on the size of your individual squares.
Before making dozens of squares, crochet one complete square and measure it.
This gives you a much more accurate starting point for planning your project.
What Can You Make With Flower Granny Squares?
Flower granny squares are incredibly versatile.
You can use them to make:
- Crochet blankets
- Baby blankets
- Lapghans
- Bedspreads
- Cushions
- Tote bags
- Handbags
- Cardigans
- Sweaters
- Vests
- Shawls
- Scarves
- Table runners
- Wall décor
- Home accessories
You can also use a single large flower granny square as the focal point of a project.
Beginner Tips for Making Flower Granny Squares
- Start with one complete square
- Don't immediately start making 30 or 40 squares.
- Make one complete square first.
- Check the size, shape and tension before beginning the rest.
- Read the pattern before crocheting
Look through the entire pattern and identify:
- Color changes
- Special stitches
- Corner instructions
- Joining instructions
- Final stitch count
Mark your corners - If you find it difficult to identify the corner spaces, use stitch markers.
Count regularly - A small mistake early in a round can affect the shape of the entire square.
Weave in your ends as you go - If you are making a large blanket, dealing with dozens of loose ends at the end can become a frustrating job.
Common Flower Granny Square Problems
My flower is not lying flat - Check your tension and stitch count.
A flower can curl if the stitches are too tight or if too many stitches have been added.
My square isn't square - Check the four corners first.
Make sure each corner is worked exactly as specified in the pattern.
Also check that you haven't accidentally skipped or added stitches along the sides.
My petals look uneven
Try to maintain consistent tension throughout each petal.
Count the stitches in each petal rather than relying only on how it looks.
My squares are different sizes
Make a gauge or test square before producing the rest of your project.
Use the same yarn, hook and tension for every square.
Blocking can help bring small differences into alignment.
Flower Granny Squares vs Traditional Granny Squares
A traditional granny square usually begins with a simple center and repeated groups of double crochet.
A flower granny square adds a floral motif to the design.
| Traditional Granny Square | Flower Granny Square |
| Simple center | Floral center |
| Usually repeated dc clusters | May use textured flower stitches |
| Often quick to crochet | May require more color changes |
| Easy repeating structure | Flower-to-square construction |
| Excellent for beginners | Beginner to intermediate depending on design |
| Classic patchwork appearance | Decorative floral appearance |
Both styles are useful building blocks for larger crochet projects.
Start Your Flower Granny Square Journey
Flower granny squares are a wonderful way to build your crochet skills while creating something colorful and personal.
- Start with one square.
- Learn how the flower is constructed.
- Learn how the circle becomes a square.
- Then experiment with color, texture and different floral designs.
- Once you are comfortable with the technique, you can combine your favorite squares into larger projects such as blankets, bags, cushions and garments.
Ready to start crocheting? Explore the Stouto Creative Crochet flower granny square patterns and find your next floral project.
TUTORIALS MADE EASY
.
Beginner-Friendly Guide
Before You Begin
Before starting your flower granny square:
- Read through the entire pattern before starting.
- Check your gauge if the finished size is important.
- Count your stitches at the end of every round.
- Turn your work so the right side always faces you (unless the pattern states otherwise).
- Use stitch markers to mark the first stitch of each round if needed.
US Crochet Terminology
All Stouto crochet patterns and tutorials referenced in this guide use US crochet terminology unless otherwise stated.
- ch - chain
- sc - single crochet
- hdc - half double crochet
- dc - double crochet
- tr - treble crochet
- sl st - slip stitch
- st - stitch
- sp - space
- rnd - round
- MR - magic ring
Important terminology note
If you normally crochet using UK terminology, remember that:
US double crochet (dc) = UK treble crochet (tr)
This difference is important when following crochet patterns.
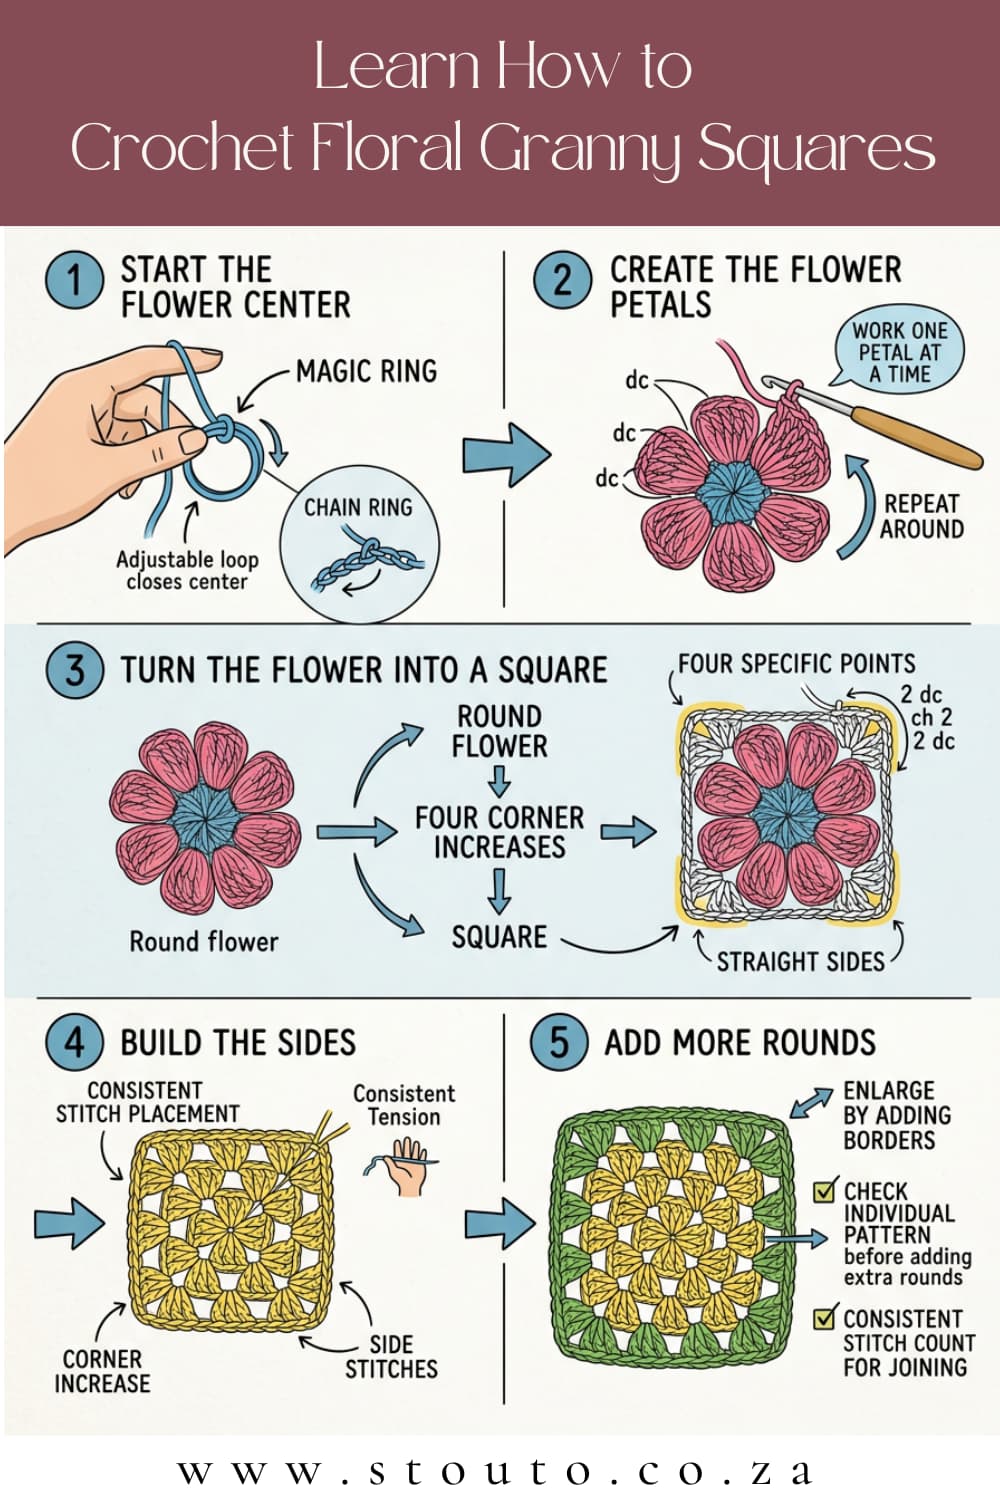
How Flower Granny Squares Are Constructed
Although flower granny squares can look complicated, most designs follow a simple basic structure.
Step 1: Create the center
The flower usually begins with a magic ring or a small chain ring.
Step 2: Crochet the flower
The next round or rounds create the petals.
Depending on the design, the petals may use:
- Single crochet
- Half double crochet
- Double crochet
- Treble crochet
- Clusters
- Puff stitches
- Popcorn stitches
- Other textured stitches
Step 3: Square the flower
- Once the flower is complete, the next round changes the shape from a circle into a square.
- This is usually achieved by creating four corners and building straight sides between them.
Step 4: Add the outer rounds
Additional rounds can be worked around the flower to increase the size of the square.
Step 5: Finish the square
The final round creates a clean outer edge so the square can be blocked and joined to other squares.
STEP-BY-STEP CROCHET GUIDE
Step-by-Step
Browse through each row below or follow along round-by-round at your own pace.
How to Crochet a Flower Granny Square
The exact instructions vary from one flower design to another, so there is not one universal flower granny square pattern.
However, the construction usually follows this basic sequence:
Center → Petals → Square Corners → Square Sides → Border
This is the most useful concept to understand when learning flower granny squares.
Step 1: Start the Flower Center
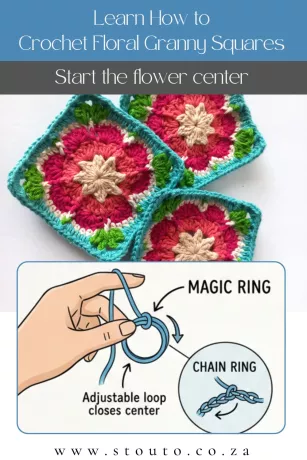
- Most flower granny squares begin with either a magic ring or a small chain ring.
- A magic ring is particularly useful because it allows you to pull the center closed after working the first round.
- If the pattern uses a chain ring instead, you will usually chain a specified number of stitches and join them with a slip stitch.
- Always follow the foundation instructions for the specific flower square you are making.
Crochet articles
CROCHET NOTES ON
Beginner's Guide to Flower Granny Squares | Learn How to Crochet Floral Granny Squares
stouto.co.za • Stouto Creative Crochet
Save for Later
Sharing is Caring
Love These Patterns? Share & Pin for Later!
Save this pattern hub to your favorite Pinterest boards, share with your crochet circle on Facebook, or copy the link for your next crafting weekend. Every share helps support independent artisan design!
Quick Social Sharing Links
Help fellow yarn enthusiasts discover tested row-by-row guides, free pattern downloads, and mindful crochet inspiration with one click:
Bookmark Tip: Press Ctrl + D / Cmd + D to save anytime.
#StoutoCreativeCrochet #CrochetTutorials #Beginner'sGuidetoFlowerGrannySquares|LearnHowtoCrochetFloralGrannySquares
Limited-Time Deals
Promotions & Special Bundles
Take advantage of our maker promotions, volume discounts, and instant digital downloads.
Website Direct Sale
Ends: Promotion ends :
35% Raverly Sale
Unlock row-by-row blankets, botanical squares, and wearable patterns with instant PDF delivery.
APPLY COUPON AT CHECKOUT:
No code needed
Etsy Store Exclusive
Save 30% Auto
PROMO CODE : STOUTO30OFF
Get 30% off any flower motifs, throw blankets, or cushion patterns on Etsy. Use Promocode .
Open Etsy Store
Over 847 ★★★★★ reviews
Direct PDF Perks
Lifetime Access
VIP Maker Direct Delivery Guarantee
- Instant PDF download link right after purchase
- Formatted for home printing & tablet row-checkers
- Free errata notifications and chart expansions
EXPAND YOUR STITCH REPERTOIRE
View All Stitch Guides →
Explore More Crochet Tutorials on the Website
EXPLORE PATTERNS
View All Crochet Patterns →
Related Patterns

FAQ
Frequently Asked Questions
Are flower granny squares suitable for beginners?
Yes. Many flower granny squares are suitable for beginners once you understand basic crochet stitches and working in the round. Start with a simpler floral design before moving on to heavily textured or three-dimensional flowers.
What crochet stitches do I need for flower granny squares?
This depends on the pattern. Many designs use chain, single crochet, half double crochet, double crochet and slip stitches. More textured flower designs may also use puff, popcorn or cluster stitches.
What crochet terminology does Stouto use?
The Stouto patterns referenced in this guide use standard US crochet terminology. Individual patterns include their own stitch abbreviations and special stitch instructions.
How do you turn a flower into a granny square?
The circular flower is transformed into a square by creating four corner sections and building straight sides between them. Additional rounds then reinforce the square shape.
What yarn is best for flower granny squares?
Smooth cotton or cotton-blend yarn is a good choice because it provides clear stitch definition. DK and medium-weight yarns are both commonly used, depending on the pattern and desired finished size.
Can I use different colors for every flower granny square?
Absolutely. Using different color combinations is one of the easiest ways to create a unique blanket. You can use the same flower pattern throughout and change the colors for each square.
Do flower granny squares need to be blocked?
Not always, but blocking can help straighten the edges and make multiple squares more consistent before joining.
Can I make a blanket from flower granny squares?
Yes. Flower granny squares are ideal for blankets. Make individual squares, block them if necessary, arrange them into your desired layout and join them together.
How many granny squares do I need for a blanket?
This depends on the finished size of each square and the desired blanket dimensions. Make one square first, measure it, and then calculate how many squares you need across and down.
What can I make with one flower granny square?
A single large flower granny square can be used as a cushion front, bag panel, wall decoration or other small project. Multiple squares can be joined to make blankets, garments, bags and home décor.

About the Designer
Hi, I'm Linda, the designer behind Stouto Creative Crochet. I create original crochet patterns inspired by colour, texture, and the joy of handmade crafts.
Each pattern is personally designed, written, tested, and photographed to provide clear instructions and an enjoyable crochet experience. My goal is to help crocheters of all skill levels create beautiful projects they can be proud of.
Discover more crochet patterns, tutorials, and creative resources from Stouto Creative Crochet.
Affiliate Partners & Maker Resources
Favorite Yarns, Craft Partners & Recommended Blogs
Discover our trusted yarn mills, partner craft platforms, and inspiring crochet friends. When you shop through these links, you support Stouto Creative Crochet at no extra cost to you.
Transparent Disclosure: We only partner with platforms and yarn makers we genuinely use and love.
Official Partner

LoveCrafts.com
Marketplace & Yarn HubShop pattern-matched yarn bundles, Stylecraft Special DK, Paintbox Yarns, and hooks with worldwide delivery.
Pattern Community
Ravelry Store
Digital Pattern LibraryAdd Stouto patterns straight to your personal digital library, track project queues, and view thousands of community project photos.
Featured Craft Blog

FreeCrochetDesigns.com
Partner Blog & GuidesExplore weekly free pattern roundups, stitch tutorials, and guest designer spotlights curated by our sister craft blog.
Star Seller
Stouto on Etsy
Maker MarketplaceBrowse automatic multi-buy discounts, over 750 maker reviews, and instant printable downloads.
Featured Maker Blogs & Community Friends:
#StoutoCreativeCrochet
Join Our Crochet Community
We love seeing what you create! Share photos of your finished crochet projects or works in progress on my Facebook page and connect with fellow crocheters who love handmade creativity as much as you do. Start exploring today, grab your hook, and enjoy crocheting patterns that inspire, relax, and delight, one crochet stitch at a time.