Easy Round Crochet Bag Pattern


Easy Round Crochet Bag Pattern
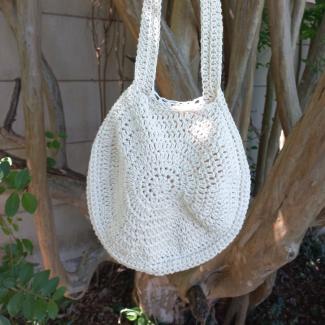
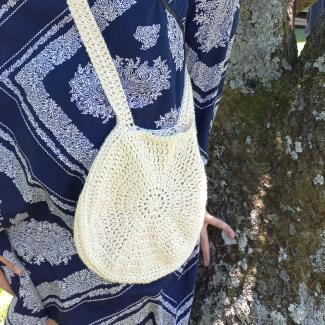
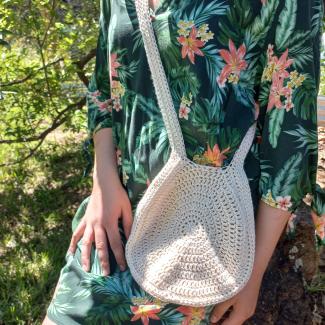
Super easy round crochet cross body bag, is a simplistic and modern shoulder sling tote bag crochet pattern.
Beginner-friendly, and great for crocheters who want to try their hand at making crochet bags, this bag is a very popular item at craft markets and gift shops and sells out quickly. If you need some quick items to sell this bag works up very quickly and one can make up to two to three bags a day, depending on your crochet speed.
About This Pattern

Our family loves going to craft markets and often participates in having our own stalls.
Somedays can be quite busy, but some markets might be slow and I find making quick circle bags a productive way to pass the time between selling items, and by far the most enjoyable and easiest way to fill up your stall products by simply creating quick crochet bags that sell like hotcakes, often someone sees me working on a bag, and by my next stall I already have returning customers wanting the items they saw me making at the previous market.
Making a round crochet bag is fast and easy and you can adjust the size according to the amount of yarn you have available, these bags can vary from large shopper bags to small hand pouches and are quite easily adaptable to make a variety of bags.
It is a usable item that you can make for any friend or colleague, and I often opt to make bags as gifts for family and friends and even work colleagues, of course, because I am such an avid lover of crochet bags, I have also made for many bags for myself.
A crochet bag is a handy item that you can carry around your daily essentials and can be a great help when you need a handy place to store stopped items on any outing.
The basic is simple, you start with a magic ring and then work your required starting stitches into the magic ring, for each round, you will increase one stitch per set, please see pattern instructions for more details, as you make each round, you will increase the side panel of your bag, so you can easily determine the size of your crochet bag.

Once you have completed your first panel you simply repeat the process for the back panel.
When your two side panels are complete, you then determine the required length of the strap that you need, you can have a short handle for an easy-to-carry handbag, a longer strap if you wish to have a shoulder bag, or even a longer strap if you wish to have a crossbody or messenger type bag.
Joining these panels is detailed in the section below, so make sure you have a look at the Joining the round panel bag section, after completing the bag pattern instructions.

What can I use a round crochet bag for ?
Crochet bags are a never-ending joy once you have mastered the basics of the pattern and your options of sizes then become endless as you can make these bags in any size you wish, make small-sized bags for toddlers and kids, and perhaps add a flower embellishment for additional style. Make these bags is some stylish variegated glitter yarn for a different evening bag, or use up all your scrap yarn bags for a colorful striped crochet bag, adding fun buttons also add and showing your creativity.

This easy round crochet bag is my goto crochet pattern for shopper, market, and beach bags, as these bags can easily be washed and cleaned for reuse after your daily shopping activities, so not only do you do your part for our planet by creating a reusable bag, but you can show off your unique style and character by making this bag in any color of your choice.

Most of the time my yarn type, choice, and color will determine the type of bag that I will be making, if I have a more lightweight strong yarn, I easily just use two skeins of yarn at a time and work two strands yarn together at a time, which makes my bag stronger and more sturdy

Looking to make a finer detailed bag? I simply adjust the crochet hook size smaller to the recommended hook for the yarn so that the gauge is slightly tighter, which gives the bag a stronger sturdier fabric, but if I am in the mood to make a slouch soft bag, then stick to the recommended crochet hook for the specific yarn and have a looser gauge on the bag. The result is still sturdy and strong but the fall of the bag is soft and stretched and makes a great option for a beach bag, where you need to carry towels and swimsuits so the stretchier fabric helps a lot when you need a bag that can hold larger items.
For more yarn types for bags please see my section under Collection of Crochet bag patterns , where I go into more into detail about the types of yarns for crochet bags.

Below is a free online version of my Super Easy Round Panel Bag.
I also have a wide selection of other bag patterns available under my Collection of Crochet Bags, where you can find many other types of crochet bags and various shapes and forms.
I hope you enjoy this pattern and make a multitude of bags, please feel free to share your work on social media and tag me in your post, I would love to see your creative input.
Below is a free online version of my Super Easy Round Panel Bag, for questions and feedback please contact me.
I hope this page was useful for you, Have questions?
You can contact me on my Facebook Page, you can contact me there, I would love to hear from you.
Want more news and updates?
Follow my Facebook Page.
I do try my best to run promotions at least once a month, on new, free patterns and discounted items, so don't miss out!
Share on Instagram or Facebook
When you make this project, share it on social media and tag me @stoutocreativecrochet or @stoutostuff whichever is easiest for you.
I would love to see what you make!
Save this free pattern to your Pinterest boards so that you can come back to it later.
What to purchase a pattern or patterns?
a downloadable pdf version is also available for this pattern, at an affordable price. Sales of my patterns helps me to continue making sharing and designing new patterns and ideas, the PDF versions of patterns are available on the following platforms.
Etsy
Raverly
LoveCrafts
Materials, Yardage Breakdown & Fiber Selection
Engineered for stash-busting joy or a disciplined heirloom palette. Every yardage estimate includes our recommended 10% tension buffer so you never run out on round 6 of the final corner.
Material Notes
All you need to know about materials required for this project.
Difficulty level: Easy
Suggested yarn for crochet tote bag pattern.
DK Cotton, Bamboo, or Nylon Fibre content yarn
Yarn Length required : +- 420m/460 yards
Recommended Crochet hook size: 4mm or 4.5 mm
Interactive Yarn & Sizing Calculator
Planning a custom baby blanket, lapghan, or super king bedspread? Adjust dimensions below to instantly calculate square counts, skeins needed, and total meters with our built-in yarn tension buffer.
Promotions & Special Bundles
Take advantage of our maker promotions, volume discounts, and instant digital downloads.
35% Raverly Sale
Unlock row-by-row blankets, botanical squares, and wearable patterns with instant PDF delivery.
PROMO CODE : STOUTO30OFF
Get 30% off any flower motifs, throw blankets, or cushion patterns on Etsy. Use Promocode .
Open Etsy StoreVIP Maker Direct Delivery Guarantee
- Instant PDF download link right after purchase
- Formatted for home printing & tablet row-checkers
- Free errata notifications and chart expansions
Size Information
Size Information
Finished Measurements
Pouch Layed flat from side to side: 25 cm
Pouch Layed flat from top to bottom: 25 cm
Bag Layed Flat Straps from top to bottom: 60 cm
Construction Guide
Construction overview
Tote Bag consist out of 3 main parts,
the front tote round panel
the front tote round panel
And the strap.
The strap is worked in one continuous row, after which the two words are joined together to form a loop.
Pattern Instructions
The pattern gives additional help for tote bag straps so you can easily adjust to your required length.
Step by Step
.

Make 2 Easy Panels for the Sling Crochet Bag
Round 1
into the magic ring, ch 3, counts as the first dc, 11 dc into magic ring, tighten magic ring by pulling the tail, join into top of start ch with sl, ch1,
( 12 dc st(s) in the round)
Round 2
RS - ch 1, counts as the first 1hdc, 1 hdc into the same dc st,
* 2 hdc into next dc st, rep from * around, join with sl into the top of ch 2, ch 1,
(24 st(s) in the round : 12 x 2sc)
Round 3
RS - ch 1, counts as first hdc, 1hdc into the same stitch, 1 hdc into next st,
* 2 hdc in next hdc st, 1 hdc in next hdc st,
rep from * around, join with sl into the top of ch 2, ch1,
(36 hdc st(s) in the round)
Round 4
RS - ch2, counts as first dc, 1dc into same st, 1 dc into next 2 sts,
* 2 dc into next dc st, 1 dc into next 2 dc sts, rep from * around, join with sl into top of starting chain, ch 1,
(48 dc st(s) in the round)
Round 5
RS - ch2, counts as first dc, 1dc into same st, 1 dc into next 3 sts,
* 2 dc into next dc st, 1 dc into next 3 dc sts, rep from * around, join with sl into top of starting chain, ch 1,
(60 dc st(s) in the round)

Round 6
RS - ch2, counts as first dc, 1dc into same st, 1 dc into next 4 sts,
* 2 dc into next dc st, 1 dc into next 4 dc sts, rep from * around, join with sl into top of starting chain, ch 1,
(72 dc st(s) in the round)
Round 7
RS - ch2, counts as first dc, 1dc into same st, 1 dc into next 5 sts,
* 2 dc into next dc st, 1 dc into next 5 dc sts, rep from * around, join with sl into top of starting chain, ch 1,
(84 dc st(s) in the round)
Round 8
RS - ch2, counts as first dc, 1dc into same st, 1 dc into next 6 sts,
* 2 dc into next dc st, 1 dc into next 6 dc sts, rep from * around, join with sl into top of starting chain, ch 1,
(96 dc st(s) in the round)
Round 9
RS - ch2, counts as first dc, 1dc into same st, 1 dc into next 7 sts,
* 2 dc into next dc st, 1 dc into next 7 dc sts, rep from * around, join with sl into top of starting chain, ch 1,
(108 dc st(s) in the round)
Round 10
RS - ch2, counts as first dc, 1dc into same st, 1 dc into next 8 sts,
* 2 dc into next dc st, 1 dc into next 8 dc sts, rep from * around, join with sl into top of starting chain, ch 1,
(120 dc st(s) in the round)
That's the first panel complete, repeat these steps for the back panel.
⚠️ This pattern is for personal use only. Please do not copy or redistribute.
Pattern Update Notice
Previous buyers can request an updated PDF, or use the free instructions on this page.
What Other Crocheters Say
Post your pattern review.
This pattern hasn’t been reviewed yet.
Be the first to share your experience and help other crocheters.
Pattern Copyright & Usage.
This crochet pattern and all associated content are the original work of Stouto Crochet.
- ✔️ Personal use allowed
- ✔️ Sell finished handmade items (small-scale)
- ❌ Do not copy, rewrite, or redistribute
- ❌ Do not share or resell PDF patterns
AI & Content Use: This pattern may not be reproduced or used to train AI systems.

About the Designer
Hi, I'm Linda, the designer behind Stouto Creative Crochet. I create original crochet patterns inspired by colour, texture, and the joy of handmade crafts.
Each pattern is personally designed, written, tested, and photographed to provide clear instructions and an enjoyable crochet experience. My goal is to help crocheters of all skill levels create beautiful projects they can be proud of.
Discover more crochet patterns, tutorials, and creative resources from Stouto Creative Crochet.