How to Crochet Flower Shells in a Row
This is one of my absolute favorite stitch combinations for adding a pretty, lacy floral texture to any project. It works beautifully as a feature panel, a repeatable stitch pattern, or a decorative row in blankets, bags, shawls, and scarf designs.
It’s quick to work, naturally rhythmic, and creates a stunning layered flower effect without complicated techniques.
Be sure to pin this page for the free Flower Shell Stitch Blanket Pattern included on page.
35% Raverly Sale
Why This Stitch Is So Beautiful
- Creates rows of dimensional flowers
- Perfect balance of open lace and solid stitches
- Works beautifully in stripes
- Easy 2/4 row repeat once established
- Looks good on blankets, clothing, bags & borders
This combination is a unique, modern take on floral texture and it works up surprisingly quickly.
Please note:
The row numbers in the example stitch diagram (in the printable version) are there to help you follow the flow of the pattern.
Swatch Details
Crochet Hook: 3 mm
Yarn: Double knit (DK) 100% cotton
Gauge: Not essential for this stitch pattern
Finished swatch size: Approx. 12 cm × 12 cm (before blocking)
How to crochet the Flower Shell Stitch
Stitch Abbreviations (US Terms)
ch – chain
sc – single crochet
hdc – half double crochet
dc – double crochet
FPdc – front post double crochet
sp – space
6dc-shell – 6 double crochets into one stitch/space
3dc-shell – 3 double crochets into one stitch/space
Pattern Structure Notes
This flower pattern is worked in odd and even row sets:
- Even rows (two rows per set) create full 6dc-shell flowers at both the start and end of each row.
- Odd rows (two rows per set) create half flowers (3dc-shells) on the ends.
This keeps the stitch pattern beautifully balanced from side to side.

Example Rows: Flower Shells in a Row
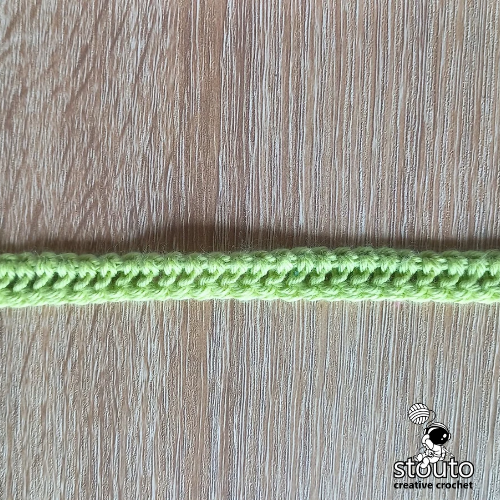
Foundation row of example
- Chain 35 + 2
- (This is (33 is uneven multiple of 3) + 2 to accommodate the half shells and edge stitches.)
- Work 1 dc in 3rd chain from hook, counts as first dc stitch, 1 dc into each chain st ( 33 dc sts)
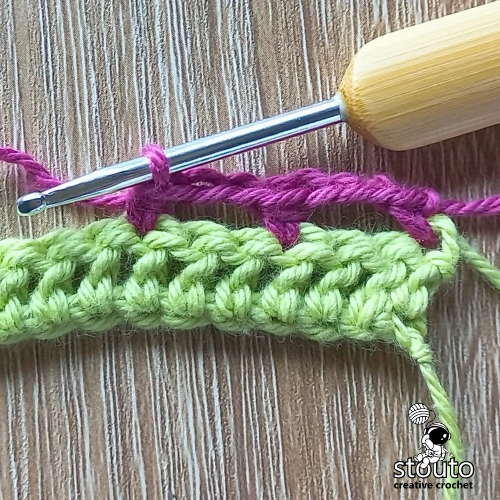
Row 1
Join a new color with a slip stitch.
Work 1 sc over the slip stitch to secure the yarn.
Ch 2 (counts as first hdc stitch of row),
Pattern:
*Ch 2, skip 2 sts, 1 hdc into next st; repeat from * across until end of row.
Work 1 hdc into last remaining stitch.
Fasten off.

Row 2
Join as before.
Ch 3 (counts as first dc),
Pattern:
*3dc-shell, ch1, 3dc-shell, into next 2ch-space, 1 hdc into next 2ch-space; repeat from * until end of row.
Work 1 dc into last remaining stitch.
Fasten off.

Row 3
Join as before.
Ch 2 (counts as first dc),
Pattern:
*Ch 2, sc into 1ch-sp, between 3dc-shells below, ch 2, FPdc around next hdc post from the previous row, ch 1, FPdc around the same hdc (FPdc V-Stitch); repeat from * until end of row.
Work 1 dc into remaining stitch.
Fasten off.

Row 4
Join as before.
Ch 2 (counts as first dc).
Work a 3dc-shell into the bottom of the last stitch worked,
1 hdc into the sc from the row before.
Pattern:
*3dc-shell, into next 2ch-space,1 hdc into next 2ch-space; repeat from * until the last FPdc V-Stitch of the previous row.
Work 3dc-shell into the 1ch-space,
then 1 dc into remaining stitch.
Fasten off.

Row 5
Join as before.
Ch 2 (counts as first dc).
Pattern:
*FPdc around next hdc post from the row before, ch 1, FPdc around the same hdc (FPdc V-Stitch), ch 2, sc into 1ch-sp between 3dc-shells, ch 2; repeat from * until the last FPdc V-Stitch.
Ch 2, sc into the 3rd stitch of the 3dc-shell,
1 dc into each remaining stitch.
Fasten off.

Row 6
Join as before.
Ch 2 (counts as first dc).
Pattern:
*3dc-shell, into next 2ch-space,1 hdc into next 2ch-space; repeat from * until end of row.
Work 1 dc into the remaining stitch.
Fasten off.

Row 7
Join as before.
Ch 2 (counts as first dc).
Pattern:
*Ch 2, sc into 1ch-sp between 3dc-shell sts, ch 2, FPdc around next hdc post, ch 1, FPdc around the same hdc (FPdc V-Stitch); repeat from * until end of row.
Work 1 dc into the remaining stitch.
Fasten off.

Row 8
Join as before.
Ch 2 (counts as first dc).
Pattern:
*3dc-shell, into sc stitch, 3dc-shell,into next 2ch-space; repeat from * until the last FPdc V-Stitch of the previous row.
Work 1 dc into the remaining stitch.
Fasten off.
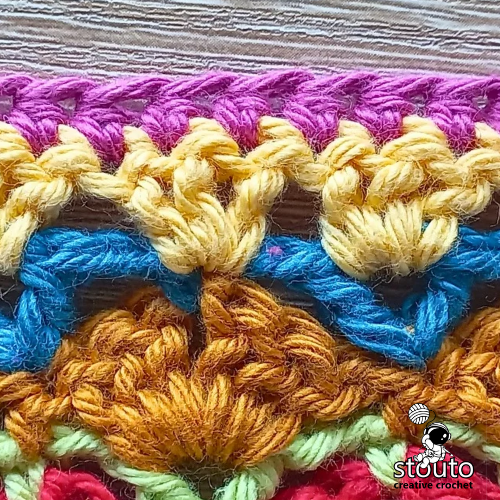
Row 9
Join as before.
Ch 1 (counts as first hdc).
Pattern:
*1 hdc into each of the 3dc stitches; repeat from * until the last FPdc V-Stitch of the previous row.
Work 1 hdc into the remaining stitch.
Fasten off.

Row 10
Join as before.
Ch 2 (counts as first hdc).
Pattern:
*1 dc into each of the dc stitch; repeat from * until the last hdc stitch of the previous row.
Work 1 dc into the remaining stitch.
Fasten off.
FAQ : How to Crochet Flower Shell Stitch
1. What is the flower shell stitch in crochet?
The flower shell stitch is a textured crochet technique that creates small, layered “petal” shapes using combinations of shells, chains, and front post stitches. It produces a lacy floral effect that works beautifully in blankets, scarves, bags, and decorative panels.
How do I start the flower shell stitch?
To begin the flower shell stitch, you typically start with a foundation row of chains spaced to allow shells to sit evenly. Most patterns begin with single crochet or half double crochet sections followed by 5 6 dc shells (3dc,ch1,3dc) worked into chain spaces. The pattern you follow may also include standing stitches for cleaner color changes.
What is the easiest way to learn how to crochet this flower shell stitch?
- The easiest way to learn is to break the stitch into three repeatable actions:
- Create chain spaces
- Build full or half shells (3dc or 6dc)
- Anchor the flowers with sc, hdc, and FPdc stitches
- Once you understand those elements, repeating the rows becomes very intuitive.
How many rows does the flower shell stitch repeat?
This flower shell stitch patterns repeat over a 10-row sequence.
In this tutorial example, the texture forms through a series of 10 rows that alternate between:
- 6dc (3dc,ch13dc) flowers,
- half shells,
- FPdc V-stitches, and
- chain-based lacy rows.
Can beginners learn how to crochet flower shell stitch?
Yes! The flower shell stitch looks complex but uses very simple foundational stitches: chain, single crochet, half double crochet, double crochet, and front post double crochet. Once you understand the rhythm, even beginners can follow it.
What projects can I make using the flower shell stitch?
The flower shell stitch is perfect for:
- Blankets and baby blankets
- Shawls and wraps
- Cardigans and ponchos
- Bags and totes
- Spring and floral-themed projects
- Decorative borders
It adds instant elegance to any crochet project.
Why does the flower shell stitch alternate between odd and even rows?
The alternating structure helps the flowers stack evenly and creates natural spacing for half and full shells.
- Even rows build full flowers on both ends.
- Odd rows form half flowers to keep the stitch pattern balanced.
How do I keep my flower shell stitch edges straight?
To keep the edges clean:
- Always work the beginning standing stitches as written.
- Maintain consistent turning chains (usually ch 2 or ch 3).
- Finish each row with the dc or hdc specified, even if the shell pattern ends early.
This prevents slanting or widening at the sides.
Can I use multiple colors in the flower shell stitch?
Absolutely! This stitch is stunning in multi-color rows. Changing colors every 1–2 rows enhances the floral petal effect and makes each layer pop.
For this pattern example I changed color every row,
What yarn works best for the flower shell stitch?
Yarns that have good stitch definition are ideal, such as:
- DK cotton
- Light worsted acrylic
- Soft wool blends
- Bamboo blends
Avoid fuzzy yarns if you want the shells and petal details to stand out clearly.
Quick Stitch Guide
All stitch instructions are available in both US Crochet Terminology and UK Crochet Terminology, making it easy to follow along using the terms you are most familiar with.
If you are new to any of the stitches used in this pattern, we recommend reviewing the relevant stitch guide before starting. Each guide includes step-by-step instructions, helpful tips, and stitch terminology conversions where applicable.
Take your time, practice any unfamiliar stitches, and most importantly—enjoy the process of creating your blanket one row at a time.
UK : ch - chain
AFR : ks - ketting steek
Make a slipknot, yo, pull through loop. Repeat for desired chains.
UK : htr - half treble crochet
AFR : hlb - Halwe Langbeentjie / Half Lang Been / half-dubblehekel
1. Yarn over.
2. Insert hook into next stitch and pull up a loop (3 loops).
3. Yarn over and pull through all 3 loops.
UK : tr - treble crochet
AFR : lb - Langbeentjie / dubblehekel
1. Yarn over.
2. Insert hook into stitch, pull up a loop (3 loops).
3. Yarn over and pull through first 2 loops (2 remain).
4. Yarn over and pull through last 2 loops.
UK : fptr - front post treble crochet
AFR : vblb / vslb - Voorste Been Langbeentjie / Voor Stam Langbeentjie / voorpaal-dubblehekel
1. Yarn over, insert hook front→back→front around post.
2. Yarn over, pull up loop (3 loops).
3. Yarn over, pull through first 2 loops, yarn over, pull through last 2 loops.
UK : sh - Shell stitch
AFR : skulp - skulp steek
1. Work 3 dc of any (hdc,dc,tr) into same stitch or space.
2. Skip 2–3 sts depending on pattern, repeat.
UK : v st - V-stitch
AFR : Vst - V steek (lb,ks,lb)
1. Work dc, ch1, dc into same stitch/space.
2. Skip per pattern and repeat; creates an open V motif.
UK : 3tr - 3 treble crochet
AFR : 3lb - 3 Langbeentjies in selfde steek
1. Work 3 dc into the same stitch (one after the other).
2. Space or skip per pattern to create clusters/shells.
UK : rep from * - repeat from *
AFR : her * - Herhaal van *
1) Find the *.
2) Work the instructions after it.
3) When told, go back to * and repeat the sequence the required number of times.
4) Stop when the pattern says.
UK : rep rows - repeat rows
AFR : Her/herh - Herhaal
Work rows as written for repetition count.

35% Raverly Sale
Step by Step
How to Crochet a Lace Blanket using the Flower Shell Stitch Pattern
Notes for Resizing the Flower Shell Lace Blanket
This pattern uses a stitch multiple that allows the flower shells, half-shells, FPdc V-stitches, and chain spacing to line up correctly.
To resize your blanket (wider or narrower), use the instructions below.
Stitch Multiple for Resizing
The main pattern repeat is based on a multiple of 3 stitches.
To resize, use the formula:
- Foundation chain = (uneven multiple of 3) + 6
Where:
- Uneven multiple of 3 = main pattern repeat +6 = 3 edge stitches on each side
Edge stitches never change
They are always +6, no matter the size of the blanket.
How to Calculate a New Starting Chain
Step-by-step:
- Decide how many pattern repeats you want. Visit my Crochet Blanket Size Page for sizes.
- Multiply that number by 3
- Add +6 for your side stitches.
Examples of Different Blanket Sizes using example size crochet yarn and hook.
- Hook: 3 mm
- Yarn: Double knit (DK) 100% cotton
- Gauge: Not essential for this stitch pattern
Baby Blanket (Small)
- 42 x 57 inches / 108 x 145 cm
- Chain : 213 + 6 pattern stitches → 71 x 3 stitch repeats
- Repeat rows 1 to 10 - 20 times for required length.
Lapghan
- 36 x 49 inches / 90 x 123 cm
- Chain : 177 + 6 pattern stitches → 59 x 3 stitch repeats
- Repeat rows 1 to 10 - 17 times for required length.
Throw Blanket
- 52 x 60 inches / 130 x 150 cm
- Chain : 453 + 6 pattern stitches → 151 x 3 stitch repeats
- Repeat rows 1 to 10 - 21 times for required length.
Queen Size Bed Blanket
- 90 x 100inches / 205 x 255 cm
- Chain : 735 + 6 pattern stitches → 245 x 3 stitch repeats
- Repeat rows 1 to 10 - 29 times for required length.
Using a different weight yarn and crochet hook.
- Make a small size sample swatch of 15dc sts x 6 rows.
- Measure your swatch width
- Divide swatch width by the width of your required blanket size
- For example :
- Throw Blanket = 52 x 60 inches / 130 x 150 cm
- Swatch Width = 8cm
- 130/8 cm = 22.5
- You then times the result with the amount of stitches in swatch 22.5 * 9 = 202.5 sts
- You will need uneven multiples of 3 sts , so divide your answer by 3 = 202.5/3 =67.5
- You can't crochet a 0.5 sts , so you take the whole value only = 67 and times that by 3 =
- 67 x 3 sts = 201 sts for pattern repeat + 6 for edge stitches = Totals 207 sts for your row.
- + 2 for your starting foundation row stitch.
- For example :
NOTE: if this was an even number like 64 or 66, you will have to make it an uneven number - either up or down - depending which you prefer.
How to Know If Your Chain Count Will Work
Your chain count is correct when:
- The flower shells line up neatly
- The half shells appear at the beginning and end of correct rows
- FPdc V-stitches fall directly over the hdc posts
- The 3-stitch borders stay straight on both sides
If any of these look off after Row 2 or 3, your starting chain likely wasn’t the correct multiple of 3.
Can I Add More Side Stitches?
Yes!
You may increase side stitches to create wider borders.
- If you want 5 stitches on each side instead of 3:
- Add +10 instead of +6.
- If you want 7 stitches on each side:
- Add +14 instead of +6.
Everything else stays the same.
Adjusting for Tension & Yarn Changes
If your blanket is coming out too narrow:
- Add 1–3 extra pattern repeats (each repeat = +3 stitches)
If it’s too wide:
- Remove 1–2 pattern repeats
Because the stitch repeat is so small, your width can be adjusted very precisely.
Flower Shells in a Row Blanket Pattern
- 52 x 60 inches / 130 x 150 cm
- Chain : 453 + 6 pattern stitches → 151 x 3 stitch repeats
- Repeat rows 1 to 10 - 21 times for required length.
Foundation Row
Ch 459+2 - (453 + 6 pattern stitches → 151 x 3 stitch repeats)
Dc in 3rd ch from hook (counts as dc).
Dc across the entire chain.
You now have 459 dc stitches (453 pattern + 6 edge stitches).
Every row below begins with:
- 3 extra stitches at the front
- pattern repeat
- 3 extra stitches at the end*
Your 3-stitch edges will always be either dc or hdc, depending on row type.
Row 1 : Base Lace Row (HDC + Ch Spaces)
Join a new colour.
Sc over slip knot to anchor.
Ch 2 (counts as hdc).
Work 3 extra hdc stitches (edge)
hdc in next 3 sts.
Pattern repeat:
*Ch 2, sk 2, 1 hdc in next st*
Repeat across until 3 sts remain.
Work last 3 edge stitches:
Hdc in the last 3 sts.
Fasten off.
Row 2 : Shell Row
Join a new colour.
Ch 3 (counts as dc).
Work 3 dc (edge stitches)
Dc in next 3 sts.
Pattern repeat:
*3dc-shell, ch 1, 3dc-shell in next 2ch-space,
1 hdc in next 2ch-space*
Repeat across until 3 sts remain.
End edge:
Dc in last 3 sts.
Fasten off.
Row 3 : FPdc V-Stitch Row
Join yarn.
Ch 2 (counts as dc).
Work 3 dc (edge)
Pattern repeat:
*Ch 2, sc into 1ch-space between shell clusters,
ch 2, FPdc around next hdc, ch 1, FPdc around same hdc*
Repeat across until 3 sts remain.
Edge stitches:
Dc in last 3 sts.
Fasten off.
Row 4 : Half Shell Start + Full Shell Row
Join yarn.
Ch 2 (counts as dc).
Work 3 dc (edge)
Half-shell beginning:
3dc-shell into the base of the last dc stitch.
1 hdc into next sc.
Pattern repeat:
*3dc-shell into next 2ch-space,
1 hdc into next 2ch-space*
Repeat across until 1ch-space before final V-Stitch.
End of repeat:
3dc-shell into that 1ch-space.
Edge stitches:
Dc in last 3 sts.
Fasten off.
Row 5 : FPdc V-Stitch Lace Row
Join yarn.
Ch 2 (counts as dc).
Work 3 dc (edge)
Pattern repeat:
*FPdc around next hdc, ch 1, FPdc around same hdc,
ch 2, sc into next 1ch-space between shells, ch 2*
Repeat to last V-Stitch.
Ch 2, sc into 3rd dc of 3dc-shell.
Edge stitches:
Dc in last 3 sts.
Fasten off.
Row 6 : Full Shell Repeat Row
Join yarn.
Ch 2 (counts as dc).
Work 3 dc (edge)
Pattern repeat:
*3dc-shell into next 2ch-space,
1 hdc into next 2ch-space*
Repeat across until 3 sts remain.
Edge stitches:
Dc in last 3 sts.
Fasten off.
Row 7: Lace Row (Repeat Row 3 Layout)
Join yarn.
Ch 2 (counts as dc).
Work 3 dc (edge)
Pattern:
*Ch 2, sc into 1ch-space between shells,
ch 2, FPdc around next hdc, ch 1, FPdc around same hdc*
Repeat across until 3 sts remain.
Edge stitches:
Dc in last 3 sts.
Fasten off.
Row 8 : Clustered Shell Row
Join yarn.
Ch 2 (counts as dc).
Work 3 dc (edge)
Pattern:
*3dc into next 2ch-space,
sk sc,
3dc into next 2ch-space,
3dc into next 1ch-space*
Repeat until 3 sts remain.
Edge stitches:
Dc in last 3 sts.
Fasten off.
Row 9 : HDC Texture Row
Join yarn.
Ch 1 (counts as hdc).
Work 3 hdc (edge)
Pattern:
*1 hdc into each dc of the 3dc clusters*
Repeat until 3 sts remain.
Edge stitches:
Hdc in last 3 sts.
Fasten off.
Row 10 : DC Row (Reset Row)
Join yarn.
Ch 2 (counts as dc).
Work 3 dc (edge)
Pattern:
Dc across all stitch groups until 3 sts remain.
Edge stitches:
Dc in last 3 sts.
Fasten off.
Repeat Rows
Your full 10-row sequence is the complete flower shell repeat.
Repeat Rows 1–10 until your blanket reaches desired length approximately 29 x 10 row repeats.
Find more tutorials
Explore More Crochet Tutorials on the Website
If you need extra help while working on your stitch sampler blanket, you can explore the crochet tutorials section on the website. These guides explain crochet stitches, techniques, and pattern methods in a clear and beginner-friendly way.
You’ll find helpful stitch tutorials, visual diagrams, and step-by-step guides that make it easier to learn new stitches and improve your crochet skills while completing your project.
Here are some pattern ideas

Feel free to explore the additional sections of our website for even more crochet patterns, helpful tutorials, and creative inspiration.
Each section is thoughtfully organized to make it easy to find exactly what you’re looking for and to support you at every stage of your crochet journey.


Explore More Popular Crochet Patterns You’ll Love
If you enjoyed this pattern, be sure to explore some of our other most-loved crochet designs.
From textured granny squares and patchwork flower motifs to beginner-friendly blankets and statement afghans, each pattern is created with clear instructions, step-by-step guidance, and practical yarn details to help you crochet with confidence.
Whether you're building a full blanket collection, creating a thoughtful handmade gift, or simply looking for your next relaxing project, you’ll find plenty of inspiration across our popular pattern pages.
Take a look around and discover your next favourite crochet project.
You will find the full list of crochet patterns on the Crochet pattern collection page.

Crochet Temperature Blanket Pattern – 365 Rows of Mixed Stitches
Looking for the perfect temperature blanket crochet pattern free PDF to keep you inspired all year long? This temperature blanket pattern is more than just another project , it’s a creative memory-maker. Designed as a 365 day crochet blanket, this beginner-friendly design lets you record daily weather changes in yarn, transforming temperatures into a beautiful mix of colour, texture, and personal meaning.