The ultimate summer accessory—beautiful, sustainable, and beginner-friendly
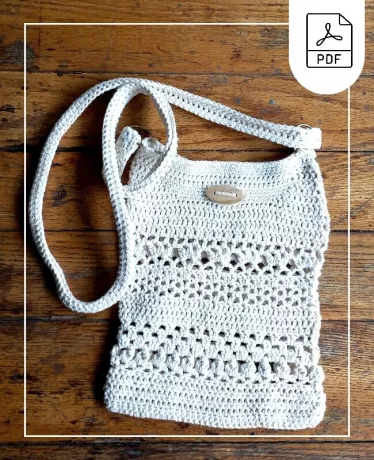
Introducing the Lace & Flower Cotton Tote Bag, a light, lacy sling bag made using simple stitches and sustainable yarns. Whether you're heading to the market, beach, or brunch, this charming crochet tote bag is sure to become your go-to carry-all.
35% Raverly Sale
About This Pattern
Create your own stylish crochet cotton tote bag with this free crochet pattern from Stouto. The Lace & Flower Cotton Tote Bag is a lightweight round shoulder sling bag featuring elegant lace stitches, flower-inspired textures, and a comfortable shoulder strap that's perfect for everyday use.
Whether you're heading to the farmers market, beach, library, or simply running errands, this reusable crochet tote bag combines beauty with practicality. Made using durable cotton or bamboo yarn, it's an eco-friendly alternative to disposable shopping bags while showcasing timeless handmade style.
Designed for confident beginners and experienced crocheters alike, this free crochet tote bag pattern includes step-by-step written instructions that guide you through creating a bag you'll enjoy using for years.
Why You'll Love This Crochet Tote Bag
This crochet tote bag is designed to be both beautiful and practical, making it an ideal project for everyday use.
Pattern Features
- Free crochet tote bag pattern
- Beginner-friendly written instructions
- Worked seamlessly in the round
- Beautiful lace stitch panels
- Flower-inspired textured design
- Comfortable shoulder sling strap
- Optional button closure
- Optional metal ring strap construction
- Lightweight yet durable
- Easy to customise
- Perfect for cotton or bamboo yarn
- Great for everyday use
The combination of decorative lace stitches and sturdy construction creates a bag that looks elegant while remaining practical enough for shopping, travel, or carrying your latest crochet project.

Materials You'll Need:
- 4mm Crochet Hook Approx. ¾ of a 250g skein (415m/454yds) of 100% Virgin Cotton or Bamboo Yarn
- Metal Rings (Approx. 3cm x 3cm) – optional for straps
- Decorative Button (Approx. 2.5cm x 4cm) – optional
- Scissors & Yarn Needle for finishing
Tips for making this tote bag:
- Adjust the strap length by changing your foundation chain
- Modify the bag’s depth by adding or reducing row repeats
- Want a tighter strap? Swap double crochets for single crochets
- Handmade totes like this are top-sellers at craft fairs and markets!
The Perfect Handmade Gift
Looking for a thoughtful handmade present?
The Lace & Flower Cotton Tote Bag makes a wonderful gift for birthdays, Mother's Day, Christmas, housewarming celebrations, or simply because.
Crochet it in neutral shades for a modern minimalist look or choose vibrant colours for a cheerful boho-inspired accessory. Because it's practical as well as beautiful, it's a gift that's sure to be used and appreciated.
It's also an excellent project for using up leftover cotton yarn while creating something both sustainable and stylish.
Pattern Highlights
The Lace & Flower Cotton Tote Bag is worked from the base upward in continuous rounds, creating a sturdy circular shape with beautiful decorative stitch details.
The pattern includes:
- Complete written instructions
- Lace stitch panels
- Flower-inspired textured stitches
- Comfortable shoulder strap
- Instructions for adding metal rings
- Alternative strap worked directly into the bag
- Optional buttonhole section
- Easy customisation options
The finished tote is lightweight enough for everyday use while remaining strong enough for groceries, books, beach essentials, or crochet supplies.
Why Choose a Cotton Tote Bag?
Cotton yarn is one of the best choices for crochet bags because it offers excellent durability, strength, and stitch definition.
Unlike acrylic yarn, cotton stretches much less over time, helping your handmade tote maintain its shape even after regular use. Cotton is also breathable, washable, and environmentally friendly, making it perfect for reusable shopping bags and everyday accessories.
A handmade cotton tote bag is ideal for:
- Grocery shopping
- Farmers market
- Beach trips
- Library visits
- Everyday errands
- Crochet project storage
- Weekend travel
- Picnics
- Holiday shopping
Creating your own cotton tote not only gives you a stylish handmade accessory but also helps reduce the use of disposable plastic bags.


Get the printable PDF
Materials & Tools
| Hook | 4mm Crochet Hooks |
|---|---|
| Yarn Weight | Worsted Yarn |
| Fibre Type | yarn : Organic Cotton Yarn |
Materials
You'll need:
- 4 mm crochet hook
- Approximately ¾ of a 250 g skein (415 m / 454 yds) of 100% Virgin Cotton or Bamboo yarn
- Two metal rings (approximately 3 cm diameter)
- Decorative button (approximately 2.5 cm × 4 cm)
- Yarn needle
- Stitch markers
- Scissors
Best Yarn for Crochet Tote Bags
Natural fibres create the strongest and longest-lasting crochet bags.
Recommended yarns include:
- 100% Cotton
- Mercerised Cotton
- Recycled Cotton
- Cotton Bamboo Blends
- Cotton Linen Blends
These yarns provide excellent stitch definition while helping your bag retain its shape.
Pattern Instructions
Written Instructions
Crochet Skills Required
This pattern uses simple crochet techniques, making it suitable for confident beginners.
You'll use:
- Chain Stitch (ch)
- Slip Stitch (sl st)
- Single Crochet (sc)
- Half Double Crochet (hdc)
- Double Crochet (dc)
- Working in the Round
- Basic Lace Stitch Construction
- Simple Repeats
If you can crochet basic stitches, you'll enjoy making this tote.
Pattern notes
- The pattern is worked in rounds.
- Patterns start with a single chain
- Row1 is worked into starting chain
- 84 single stitches per row
- 42 single st(s) is used for the front bag side
- 42 single st(s) is used for the back bag side
- Work RS - Right side facing outwards.
Crochet Skills Required
This pattern uses simple crochet techniques, making it suitable for confident beginners.
You'll use:
- Chain Stitch (ch)
- Slip Stitch (sl st)
- Single Crochet (sc)
- Half Double Crochet (hdc)
- Double Crochet (dc)
- Working in the Round
- Basic Lace Stitch Construction
- Simple Repeats
If you can crochet basic stitches, you'll enjoy making this tote.
Tips for Making Your Crochet Tote Bag
Personalise your bag to suit your style and needs.
- Adjust the shoulder strap by changing the starting chain.
- Add extra repeats to create a deeper tote.
- Use single crochet straps for additional strength.
- Sew in a fabric lining for extra durability.
- Add an inside pocket.
- Attach magnetic snaps or a decorative wooden button.
- Use recycled cotton yarn for an eco-friendly finish.
- Block your finished bag for crisp stitch definition.
Every colour combination creates a completely different look, making this a pattern you'll enjoy crocheting more than once.
Ways to Use Your Crochet Tote Bag
One of the best features of this pattern is its versatility.
Your finished tote works beautifully as a:
- Market bag
- Shopping bag
- Beach tote
- Everyday shoulder bag
- Crochet project bag
- Knitting bag
- Library bag
- Picnic bag
- Travel carry bag
- Handmade gift
The timeless round shape makes it suitable for every season.
Care Instructions
To keep your crochet tote looking its best:
- Wash according to your yarn manufacturer's instructions.
- Lay flat to dry.
- Avoid carrying excessively heavy loads.
- Store flat when not in use.
- Lightly steam or block if needed to refresh the shape.
With proper care, your handmade cotton tote will provide years of everyday use.
OPTIONAL : If you wish to add a button hole to the top of your bag , replace rows 25 & 26 , with these instructions.
The strap is worked apart from the bag and only connected when complete.
Chain 150 or however long you wish your strap to be.
Rows are worked in a single st pattern so no multiples…
Pattern Reference
This page is part of a larger crochet pattern and is intended as a companion tutorial or stitch reference. For complete instructions, materials, sizing information, and all pattern sections, please visit the main pattern page.Step by Step
⚠️ This pattern is for personal use only. Please do not copy or redistribute.
Rows 1 to 15
Base of the bag
Start with chain a row of 39 chains.
Row / Round 1

1 hdc in 3rd chain from the hook, 4hdc into the same chain stitch, 1 hdc into each of the chain stitches, until the second last st of starting chain (35 sts) , 6 hdc into the last stitch of the starting chain.
Turn the chain round,work stitches back on the chain,
1 hdc into each stitch on the chain until the end, Join with sl st into ch 1 of the starting ch 3. 84sts around round.
Round 2 & 3
ch 3, *1 hdc into next st, rep from *, join with sl st into top of starting ch 2. (84sts)
Row 4
ch 3, *1 dc into next st, rep from *, join with sl st into top of starting ch 2. (84sts)


Rows 5 to 7
ch 3, 2 dc into 1 ch-sp from row before,
* 3 dc into 1 ch-sp , repeat from *, sl st into top of ch 2.
Row 8 & 9
Slip stitch into space between 3 dc st(s),
ch 3, 2 dc into space between 3 dc st(s), - 3 dc in next space between 3 dc st(s),rep from*, sl st into top of ch 2.
Row 10
ch 2, * 1 hdc in each of the 3 dc-sts, repeat from *, sl st into top of ch 2.
Row 11 & 12
ch 3, *1 dc into next st, rep from *, join with sl st into top of starting ch 2. (84sts)
Row 13
ch 4, 1 dc into same st, (first V-st), skip 2 st(s),
* 1 V-st (1dc, ch1, 1dc ) into next st, sk 2 sts - repeat from * sl st into top of ch 4.
Row 14
Slip stitch into first ch-sp from row before,
ch 4, 1 dc into same st, (first V-st), skip 2 st(s),
* 1 V-st (1dc, ch1, 1dc ) into next st, sk 2 sts - repeat from * sl st into top of ch 4.
Row 15
Slip stitch into first ch-sp from row before,
ch 3, 2dc into same st, (first V-st), skip 2 st(s),
* 3dc into next st, sk 2 sts - repeat from * sl st into top of ch 3.
Upcycle cotton yarn, so you can feel good about your eco-friendly design. Creating the base of the straps is also covered in this section and is made by working longer stitches on the sides of the bag, and smaller stitches in the middle of the flat bag sides.You can also use this section of the pattern as a base for any other bag you wish to add straps to by adding the row stitches as indicated in the pattern below. Complete the rest of your project following the same instructions as usual, but don't finish off your rows, unless stated in the written instructions.
Cotton Tote Bag Rows 16 to 25

Row 16
Slip stitch into 2nd stitch of 3 dc-sts, ch 4, 1 dc into same st, (1dcVstitch)
*ch 2, sk 2 sts, 1 sc in next st, ch 2, sk 2 sts, 1V-st, (1dc,ch1,1dc), repeat from *, ch 2, sk 2 sts, 1 sc in next st, ch 2, sk 2 sts, for the last 3dc stitch from previous round, sl st into top of starting ch.
Row 17
Slip stitch into first ch-sp from row before,
ch 3, work another dc in same space and form first 2 dctog in ch-sp, ch1, 2 dctog ch 1, 2 dctog, ch1 in same ch-sp,
* 2 dctog, ch 1, 2 dctog, ch 1, 2 dctog, ch 1 into next 1 ch-sp , ch1 skip to next 1chsp, repeat from *, sl st into top of ch 2.

Row 18
Ch4, sk 2dctog, 1dc in 1ch-sp, ch1, sk 2dctog, 1dc in 1ch-sp,ch1,
* 1 dc in 1ch-sp, ch1, sk 2dctog, 1dc in 1ch-sp, ch1, sk 2dctog, 1dc in 1ch-sp,ch1,
repeat from *, sl st in ch4
Row 19
ch 3, *1 dc in ch-sp, 1 dc into dc st, rep from *, join with sl st into top of starting ch 2. (84sts)
Row 20 & 21
ch 3, *1 dc into next st, rep from *, join with sl st into top of starting ch 2. (84sts)
Continue along to finish off top of bags for straps.
Note the following instructions exclude the button hole to include buttonhole read : add a buttonhole to the bag ,before continuing with the strap sides, as you will have to replace rows 25 and 26 with other row instructions.
Row 22
ch 3, 1 dc into next 9 st(s), 1 hdc into next 22 st(s), 1 dc into next 20 st(s), 1 hdc into next 22 st(s), 1 dc into next 10 st(s).
Join with sl st into top of ch 2. (84sts).
Row 23
ch 3, 1 dc into next 8 st(s), 1 hdc into next 24st(s), 1 dc into next 18 st(s), 1 hdc into next 24 st(s), 1 dc into next 9 st(s). Join with sl st into top of ch 2. (84sts).
Row 24
ch 3, 1 dc into next 7 st(s), 1 hdc into next 26st(s), 1 dc into next 16 st(s), 1 hdc into next 26 st(s), 1 dc into next 9 st(s). Join with sl st into top of ch 2. (84sts).
Row 25
ch 3, dc into next 6 st(s), 1 hdc into next 28 st(s), 1 dc into next 14 st(s), 1 hdc into next 28 st(s), 1 dc into next 7 st(s). Join with sl st into top of ch 2. (84sts).
Row 26
ch 3, 1 dc into next 5 st(s), 1 hdc into next 30 st(s), 1 dc into next 12 st(s), 1 hdc into next 30 st(s), 1 dc into next 6st(s). Join with sl st into top of ch 2. (84sts).
Row 27
ch 3, 1 dc into next 4 st(s), 1 hdc into next 32 st(s), 1 dc into next 10 st(s), 1 hdc into next 32 st(s), 1 dc into next 5st(s). Join with sl st into top of ch 2. (84sts).
Row 28
ch 3, 1 dc into next 3 st(s), 1 hdc into next 34 st(s), 1 dc into next 8 st(s), 1 hdc into next 34 st(s),
1 dc into next 4st(s). Join with sl st into top of ch 2. (84sts)
Row 29
ch 3, 1 dc into next 3 st(s), 1 hdc into next 34 st(s), 1 dc into next 8 st(s), 1 hdc into next 34 st(s),
1 dc into next 4st(s). Join with sl st into top of ch 2. (84sts)
If you wish to add a button hole to top of bag.
Bag Strap sides
To add a button hole to your bag you will have to replace row 25 & 26 instructions with these instructions.
Row 25:
ch 3, counts as 1 dc, 1 dc into next 6 st(s), 1 hdc into next 12 st(s), ch 4 ,1sc into next , 1 dc into next 14 st(s), 1 hdc into next 28 st(s), 1 dc into next 7 st(s). Join with sl st into top of ch 2. (84sts).
Row 26:
ch 3, counts as 1 dc, 1 dc into next 5 st(s), 1 hdc into next 12 st(s), 6 sc st(s) into ch4 from previous row, 1sc into next 12 st(s), 1 hdc into next 30 st(s), 1 dc into next 12 st(s), 1 hdc into next 30 st(s), 1 dc into next 6st(s),
Join with sl st into top of ch 2. (84sts)
The bag has a tapered edge towards the base of the straps and is covered in this section and is made by working longer stitches on the sides of the bag, and smaller stitches in the middle.

For a bag with straps joined with metal rings
Row 30 & 31
ch 1, counts as 1st sc, 1sc into each stitch round, join with sl st into top of ch 1 . (84sts)
End off after row 30. Work in ends.
For a bag with straps joined straight to bag
Row 30
ch 1, counts as 1st sc, 1sc into each stitch round, join with sl st into top of ch 1 . (84sts)
End off after row 30. Work in ends.
Join the bag straps to the bag, then row 31. see making Straps to create straps.
Row 31
ch 1, counts as 1st sc, 1sc into each stitch round, join with sl st into top of ch 1 . (84sts)
End off after row 30. Work in ends.

Make Straps
Strap has worked apart from the bag and is only connected when complete.
ch 150 or however long you wish your strap to be.
Rows are worked in a single st pattern so no multiples are needed.
Row 1 :
ch 2, counts as first hdc, 1 hdc into every st until end of row, 1 hdc into last st of row,
Row 2
ch 2, counts as turning ch and 1st dc st, 1 dc into every st until end of row, 1 dc into last st of row,
Row 3
ch 2, counts as turning ch and 1st hdc st, 1 hdc into every st until end of row, 1 hdc into last st of row,
Row 4
ch 2, counts as turning ch and 1st dc st, 1 dc into every st until end of row, 1 dc into last st of row,
Row 5
ch 2, counts as turning ch and 1st hdc st, 1 hdc into every st until end of row, 1 dc into last st of row,
Row 6
ch 1, counts as turning ch and 1st sc st, 1scc into every st until end of row, 1sc into last st of row,
Finish off. Work ends.
Notes for straps.
If you wish to have a tighter worked strap, replace dc st(s) with either hdc or sc st(s), and simply increase your row count until you reach your strap length.
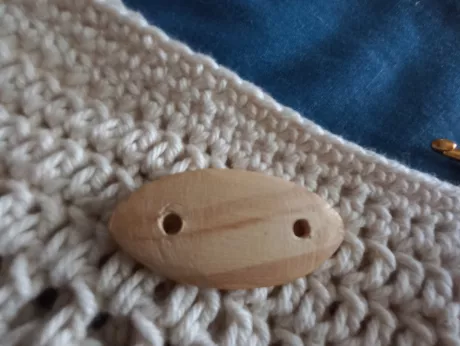
Add a button hole for a button to the Cotton tote bag
To add a button hole to your bag you will have to replace row 25 & 26 instructions with these instructions.
Row 25:
ch 3, counts as 1 dc, 1 dc into next 6 st(s),1 hdc into next 12 st(s), ch 4 ,1sc into next ,1 dc into next 14 st(s),1 hdc into next 28 st(s), 1 dc into next 7 st(s),
Join with sl st into top of ch 2. (84sts).
Row 26:
ch 3, counts as 1 dc, 1 dc into next 5 st(s),1 hdc into next 12 st(s), 6 sc st(s) into ch4 from previous row, 1sc into next 12 st(s),1 hdc into next 30 st(s),
1 dc into next 12 st(s),1 hdc into next 30 st(s), 1 dc into next 6st(s),
Join with sl st into top of ch 2. (84sts).
Connecting rings to bag for straps.

Place the bag flat down, with the front side flat against the backside of the bag.
The rings are worked into where the last 6 DC st(s) was worked in row 28. To attach the rings , join yarn 5 st(s) from where you wish to attach the rings, 1sc into each of 5 st(s), place ring just behind the row you are working on, Insert the hook into the next st ( under the ring,) Your ring will between your bag and your hook, and your yarn is in front of the ring. Yarn over hook, Pull hook back from st. Yarn over and pull thru loop. You will now have a sc st with the ring connected with a loop behind the sc st.
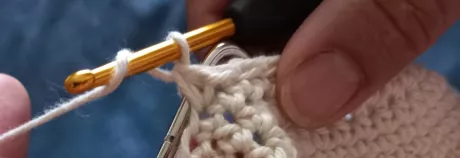
Yarn over, Holding the yarn over with your finger push hook thru next st. Yarn over hook, Pull hook back from st. Yarn over and pull thru loop. Repeat 4 more times , total of 6 sc st(s) holding ring. Place hook into last loop. Bring hook round.

Yarn over, 1sc into next st in row. Complete sc st as normal. 1sc into each st round until where the next ring needs to be joined. Repeat the above mentioned process to join the next ring. On the opposite side of the bag.
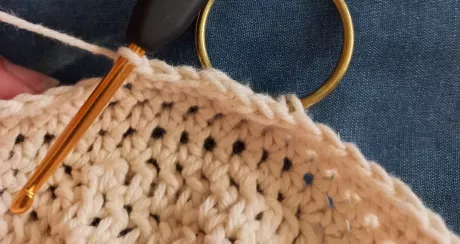
Above image shows the outside of the bag after a few sc st(s) were worked.

Connecting rings to bags for straps.
Place the bag flat down.
With the front side flat against the backside of the bag.
The rings are worked into where the last 6 DC st(s) was worked in row 28.

To work on rings start at 5 st(s) from (before) where you wish to attach the rings.
Work 1sc into each of 5 st(s) before, hold ring Laing flat just behind the row you are working on.
Insert the hook into the next st ( under the ring, Your ring now sits between your bag, your hook I behind the ring, and your yarn is in front of the ring.
Yarn over hook, Pull hook back from st. Yarn over and pull thru loop. You will now have a sc st with the ring connected with a loop behind the sc st.
Yarn over, Holding the yarn over with your finger push hook thru next st.
Yarn over hook, Pull hook back from st. Yarn over and pull thru loop. Repeat 4 more times, total of 6 sc st(s) holding ring.
Place hook into the last loop. Bring hook round. Yarn over, 1sc into next st in row. Complete sc st as normal
1sc into each st round until where the next ring needs to be joined. Repeat the above-mentioned process to join the next ring. On the opposite side of the bag.

Join finished straps to metal connectors
To join straps to the bag use a thick sewing needle and simply see the folded end around each ring. Be sure to flatten out your strap after attaching the first side to ensure there are no twists in your strap.
What Other Crocheters Say
This pattern hasn’t been reviewed yet.
Be the first to share your experience and help other crocheters.
Made it work? Share your result
Post a ReviewPattern Copyright & Usage
This crochet pattern and all associated content are the original work of Stouto Crochet.
- ✔️ Personal use allowed
- ✔️ Sell finished handmade items (small-scale)
- ❌ Do not copy, rewrite, or redistribute
- ❌ Do not share or resell PDF patterns
AI & Content Use: This pattern may not be reproduced or used to train AI systems.
Get the printable PDF
Explore More Crochet Tutorials on the Website
If you need extra help while working on your stitch sampler blanket, you can explore the crochet tutorials section on the website. These guides explain crochet stitches, techniques, and pattern methods in a clear and beginner-friendly way.
You’ll find helpful stitch tutorials, visual diagrams, and step-by-step guides that make it easier to learn new stitches and improve your crochet skills while completing your project.
Feel free to explore the additional sections of our website for even more crochet patterns, helpful tutorials, and creative inspiration.
Each section is thoughtfully organized to make it easy to find exactly what you’re looking for and to support you at every stage of your crochet journey.


Crochet Pattern FAQ
Is this crochet tote bag suitable for beginners?
Yes. This pattern uses basic crochet stitches with clear written instructions, making it an enjoyable project for confident beginners.
What is the best yarn for a crochet tote bag?
Cotton yarn is the best choice because it is strong, durable, washable, and stretches much less than acrylic yarn. Cotton bamboo and cotton linen blends are also excellent options.
How much yarn does this crochet tote bag use?
The pattern requires approximately ¾ of a 250 g skein (415 m / 454 yds) of cotton or bamboo yarn, depending on your gauge and any customisations.
Will my crochet tote bag stretch?
Like all crochet fabric, the bag may stretch slightly with use. Cotton yarn helps minimise stretching, and adding a fabric lining provides even more support.
Can I make the bag larger?
Yes. Continue increasing the circular base before beginning the sides or add additional repeats to increase the height of the bag.
Can I use acrylic yarn?
You can, but cotton produces a sturdier tote with better stitch definition and less stretching.
Is this tote suitable for shopping?
Absolutely. The sturdy construction makes it ideal for groceries, books, beach essentials, crochet projects, and everyday errands.
Can I add a lining?
Yes. A fabric lining helps reinforce the bag, prevents smaller items from slipping through the lace stitches, and reduces stretching.
Can I sell bags made from this pattern?
Yes. You are welcome to sell finished handmade bags created from this pattern. Please do not copy, redistribute, or resell the written pattern, photographs, or downloadable PDF.

About the Designer
Hi, I'm Linda, the designer behind Stouto Creative Crochet. I create original crochet patterns inspired by colour, texture, and the joy of handmade crafts.
Each pattern is personally designed, written, tested, and photographed to provide clear instructions and an enjoyable crochet experience. My goal is to help crocheters of all skill levels create beautiful projects they can be proud of.
Discover more crochet patterns, tutorials, and creative resources from Stouto Creative Crochet.
Join the Stouto Creative Crochet Newsletter